Pages

Monday, June 27, 2011

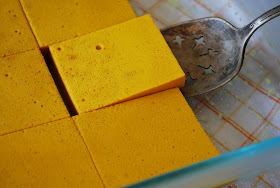
JELL-O JIGGLERS


For awhile now I have been looking for jell-o recipe that didn't involve harmful additives, dyes, and animal hooves / hair / other "scrap" parts. A few weeks ago I stumbled upon Rebecca Wood's The New Whole Foods Encyclopedia, a book that has become my new favorite and is a must have. I began reading through it and, wa-la!, a recipe for jell-o that is even better than the branded version. It also boasts extraordinary health benefits.

 The ingredient that makes it gelatinous, agar, is packed with fiber that soothes the digestive tract [great for inflammation] and chelates [or eliminates] toxic pollutants from the body. It is a great infant food [use fruit juices your baby has already tried and you have fun finger food!] and is rich in minerals. To top it off, this recipe contains no added sugar as it relies on the sweetness of the juice and fruit!

[THE RECIPE]
Recipe from Rebecca Wood's Better Than Jell-O Dessert [p. 3]

4 c. apple juice or any other juice you prefer
2 tsp. agar powder [or 4 tsp. granular agar, or 5 tbsp. kanten flakes]
2 c. diced apples, pears, or fruit of choice

Place the juice, agar, and fruit in a medium saucepan. Do not cover. Bring to a boil and watch closely to prevent boiling over. Reduce the heat, stir to blend, and simmer for 3 - 5 minutes, or until the fruit softens to desired texture. Pour into individual serving dishes [I use silicon muffin cups or, for a fun alternative, hollowed out halved fruit peels set in a muffin tin] and allow to set on counter for 30 minutes [or in refrigerator for 15 minutes].

Makes 6 cups.

Friday, June 24, 2011

WHAT'S FOR DINNER? WATER!

Okay, not really. But maybe water should be held on the same pedestal as dinner. I was planning to do a post on water when I noticed that a friend of mine had already put together a great [and recent] post on the topic. So, instead of reinventing the wheel [or saying the same thing in a slightly different way], I thought I would just direct you to her fabulous blog: http://glutenfreehope.blogspot.com/2011/06/water.html

I'll add that many people suffer from unnecessary, seemingly "chronic" headaches. When my husband comes home with a headache the first thing I ask him is if he's had enough water. Typically the response is no and more typically the headache goes away after filling up his H20 tanks. I highly recommend reading this book for more information on the healing benefits of water.

Water can be extrodinarily warming or cooling so on hot days, try a glass of cool water for some heat relief. On cool days, vice versa is true. However, be careful not to take in to much water just prior to or soon after eating a meal as it can dilute digestive juices, thus compromising healthy digestion. Really cold water can have the same effect, so generally room temperature water is best.

As for water bottles, I am a huge HUGE proponent of glass for all things that touch food or water. Recent studies are showing that even if plastic is free of BPA, it still can leach harmful substances into your water and food. Lifefactory created a glass water bottle that I love. Check it out here. If you are interested in reading more about plastic and the hazards of, look here.

The moral of the story is drink more [pure] water!

Tuesday, June 21, 2011

NATURAL GARDEN PEST CONTROL

Your garden is probably in full swing now and that means it may have become a buffet for many destructive pests. I have found one resource in particular that has really been helpful in distinguishing between good and bad bugs, infections and how to naturally control each of these.


This is, of course, one of many great resources and if you are caught trying to decipher between a couple possible problems or pests, try using other organic gardening resources to aide you in the hunt. Here are a few others that I use:


Friday, June 17, 2011

BRAN MUFFINS

1/3 c. honey
1/4 c. unrefined coconut oil
4 eggs or 3/4 c. pureed fruit [like applesauce, pears, peaches, plums or combination of any]
1 1/3 c. brown rice flour or millet flour
2 tbsp. tapioca flour or arrowroot powder
4 tbsp. buckwheat flour
1/2 c. ground flaxseed meal
4 tsp. baking powder
1 tsp. Real Salt sea salt
1 1/2 c. non-dairy milk [I use coconut milk beverage or rice milk]
1 c. rice bran

Optional add-ins:
1/2 c. raisins, dried cranberries, dried fruit
a few blueberries dropped on top of each muffin
other fruit of choice
1/2 c. shredded carrots or zucchini [may want to reduce liquid to 1 c.]

Mix together honey and oil until creamy. Blend in eggs, one at a time or pureed fruit.

In separate bowl, sift together all dry ingredients. Add to egg / fruit mixture a little at a time, alternating with liquid [non-dairy milk]. When all liquid and dry ingredients have been added, blend well on medium speed for 2 - 3 minutes.

Fold in dry fruit or shredded veggies if using.

Line muffin tin with reusable cupcake holders or grease and lightly flour each tin. Pour batter into each tin to about 2/3 full [for smaller muffins] or to top [for larger muffins].

Top with berries or other fruit if using.

Bake in preheated oven at 350 degrees for 25 - 28 minutes.

Makes appx. 12 - 18 muffins [dependent on size]

Monday, June 13, 2011

ALL NATURAL BODY ESSENTIALS


For a while now I have been making my own lotion, lip gloss, all-purpose healing salve and bug spray. I have come across some recipes that really work well for me and thought I would share a few. If I haven't grown them myself, I get all of my herbs from Global Infusion, Mountain Rose Herbs or the Bulk Herb Store. Each of these places guarantee organic herbs that have been sustainably harvested.

Cocoa Butter Creamy Lotion

7 tbsp. almond or apricot kernel base oil
2 tbsp. beeswax
2 tbsp. coconut base oil [extra virgin, unrefined]
1 tbsp. cocoa butter
1 tsp. anhydrous lanolin
9 tbsp. distilled water
2 tsp. vegetable glycerin
1/2 tsp. borax
20 drops of vanilla oil
30 drops of tangerine or sweet orange essential oil
[I have also substituted peppermint essential oil for the citrus oils or tried a peppermint and lemon combo which is amazing.]

In a double boiler warm base oils, beeswax, cocoa butter and lanolin until beeswax and cocoa butter are just melted. In another pan warm water and vegetable glycerin, add borax and stir until the borax is incoporated.

Remove both pans from heat, pour oil mixture into blender and allow to cool to body temperature [or until oil mixture just begins to thicken and becomes slightly opaque, 5 - 10 minutes]. Turn blender on medium speed and slowly drizzle water mixture into center of vortex [5 - 10 seconds]. Once all of the water mixture has been incoporated, turn off the blender and add essential oils. Blend another 5 - 10 seconds on medium speed to mix in oils. At this point you can add 1 small vitamin E capsule [poke with pin to squeeze out oil] if desired.

Pour into glass container and allow to cool, uncapped, for 30 minutes. Cap and store unrefrigerated for 1 - 2 months or refrigerated [in the summer it makes for a nice cool body treat] for 3 - 6 months.


Healing and Cooling Lip Balm

4 - 5 tbsp. almond or jojoba base oil [or you can use castor base oil for super shiny gloss]
1 tbsp. beeswax
2 tsp. honey [optional for flavor - I have found this is a little hard to incorporate and generally choose to omit it]
20 drops peppermint, spearmint or tea tree essential oil [or combination]
1/2 tube favorite lipstick [optional, for color]

In double boiler warm oil, beeswax and honey [if using] until wax is just melted. Remove from heat. Gently stir in essential oil[s] and lipstick [if using] until lipstick is melted or all has been incorporated. If using honey, make a shallow ice bath using pie or other low dish. Fill with water and ice. Place dish with honey in ice bath and stir rapidly until honey is incorporated and a frosting like paste is created. Spoon into containers, cap and cool for 2 hours. If not using honey, pour directly into lipgloss tubes or containers, cap and let cool for 2 hours [I have found it takes much less time].

Store for 1 year.

Lemony Bugs Away Spray

2 c. witch hazel
1 tsp. vegetable glycerin
20 drops of citronella essential oil
20 drops of lemongrass essential oil

Combine all ingredients in glass or metal spray jar. Shake vigorously before each use. Store for 1 year.

Note: this may stain white or light clothing.

These recipes are from Organic Body Care Recipes by Stephanie Tourles


All-Purpose Healing Salve

This is a recipe I created after last year's garden season. If any of you garden, you know that cuts abound! I didn't like the idea of using chemical-based creams [especially since I was pregnant and then nursing] so I came up with this as a nice alternative. It has worked great and I feel good about using it on my daughter this year.

I use the simpler's method of measurement which allows for versatility and simplicity. A "part" can mean cup, ounce, tablespoon, teaspoon. It is all dependent on the quantity that you want to make. The only rule is that you use the same unit of measurement consistently [this means that if you begin with 1 part representing 1 tablespoon, then 2 parts would equate to 2 tablespoons, and so on]. This is especially helpful when using dry and fresh herbs [either can be used in this recipe]. I generally equate 1 tablespoon to 1 part in this recipe, but if you want to make more just increase the oil, beeswax and grapefruit seed extract as you increase the parts.

1/4 c. extra virgin olive oil
2 parts echinacea root
2 parts comfrey leaf
2 plantain leaf
2 parts echinacea purpurea
1 part yarrow flower
1 part rosemary leaf
1 tbsp. beeswax
5 - 10 drops of grapefruit seed extract

Combine oil and herbs in small crock pot or in double boiler. Let "cook" on low heat for 6 - 8 hours [this is not the place to increase heat to decrease time as cooking at any higher heat will destroy the delicate herbs and decrease the potency of the formula].

While herbs are cooking, secure a folded piece of cheesecloth or fine mesh strainer over a glass jar. After cooking is complete, pour oil mixture through cheesecloth or fine strainer into jar. Let the herbs cool to touch and then gently squeeze or press out any remaining oil.

Add beewax and stir until melted [if oil has cooled too much, place back in crock pot or boiler and heat on low until wax has melted]. Once wax has melted, stir in grapefruit seed extract. Pour back into jar if it isn't already and let cool, uncapped, for 1 - 2 hours or until firm. Cap and store unrefrigerated for 6 months.

This salve can be used on a variety of cuts, scrapes and skin abrasions.

BABY BODY CARE

When I found out I was pregnant, I worked really hard to watch what I put into and on my body - making sure it was the highest quality, organic foods; no sugar, alcohol, or caffeine; and I used all natural products, many that I made myself [see post]. After all this work and diligence, I didn't want what touches my baby's body to be anything less. So, before my daughter was born, I made a lot of the baby care products that you would typically buy in a store. Here are a few really simple recipes that I use and have found to be wonderful!

Bottoms-Up Salve

1 part calendula flower
1 part comfrey leaf
1 part comfrey root
1 part St.-John's-wort flower
1 part lavender [optional, my addition]
1 part chamomile [optional, my addition]
Olive oil
Grated or pearled beeswax

Combine herbs and store in airtight container. Make a solar infusion by steeping 2 ounces of the herb mixture in 1 pint of olive oil for 2 weeks in a sunny spot, shaking vigourously each day OR cook in double boiler or small Crockpot on very low heat for 3 - 4 hours [this is why I like the Crockpot option]. If you choose to do the solar infusion, at the end of 2 weeks, place in double boiler or Crockpot and heat on very low heat for 1 hour. Strain herbs from oil using a folded piece of cheesecloth secured over a glass jar.

To each cup of warm herbal oil, add 1/4 cup of grated beeswax [if you want a creamier salve use a heaping 1/8 cup of beeswax rather than the 1/4 cup - I actually prefer this]. You may want to warm the oil again to help melt the wax. When the beeswax is melted, check for consistency by placing a tablespoon of the mixture in the refrigerator for a few minutes. If the salve is too hard, add a little more oil; if too soft, add a little more beeswax, heat and re-test. Pour into a short glass jar. If stored in a cool area this salve can last for months, even years.


Don't let a missing herb stop you from making these. If you can't find something just skip it and use the others!


Baby Powder

2 parts arrowroot powder
2 parts white clay
1/4 part comfrey root powder
1/4 part slippery elm or marsh mallow root powder

Mix the ingredients together and place in a glass jar with a shake top [top is optional for ease of use], such as a spice jar.

For diaper rash, add this mixture to 1/8 part organically grown goldenseal powder, 1/8 part myrrh powder, and 1/8 part echinacea powder. You may lightly scent with a few drops of essential oil such as lavender, rose or chamomile [note: not all essential oils are appropriate for use on infant / child skin so be sure to become educated in essential oils if you decide to use something not listed above].

Apply as a powder or mix into a thin paste and apply as a poulstice to the rash [poulstice is a paste covered by a piece of gauze or muslin fabric and applied directly to the skin - in this case a cloth diaper can act as the cloth covering]. Store at room temperature for 6 months.


Baby Oil [great for after baths!]

1 ounce chamomile
1/2 ounce comfrey leaf
1/2 ounce roses
1 pint apricot or almond oil [I've also used extra virgin olive oil]

Mix herbs and oil and let sit in a glass jar with a tight fitting lid for 2 weeks in a warm, sunny spot OR cook in a double boiler or small crock pot on very low heat for 1 - 2 hours. After herbs are cooked, strain using a folded piece of cheesecloth over a glass jar. You may lightly scent with a few drops of essential oil such as lavender, rose or chamomile [note: not all essential oils are appropriate for use on infant / child skin so be sure to become educated in essential oils if you decide to use something not listed above]. Use and store at room temperature.


Friday, June 10, 2011

MOUTH HEALTH


I am somewhat fussy about my mouth - in particular its cleanliness. You probably know the drill - brush for 3 full minutes, making sure to of course get all the teeth equally well; floss thoroughly; and a little tongue scraping. Okay, maybe you don't know that drill but this has become my regular routine. Ask your dentist and they will tell you that the mouth can be a good indicator of imbalance and keeping it clean will help remove harmful bacteria that can lead to illness.

When it comes to infants, as soon as the first tooth pops through start gently brushing using a baby toothbrush and water only. This not only begins to clean their mouths, but also gets them accustomed to the toothbrush and a regular brushing routine. Talk to your dentist about how best to care for your little ones teeth.

Here are a couple really simple [and inexpensive] ways to work towards mouth health:

Homemade Mouthwash

1 pint pure water
2 tsp. baking soda
3-5 drops of peppermint essential oil
pinch or two of stevia or xylitol powder

Combine all in pint jar, cover and shake well. I recommend shaking before each use to ensure that all the ingredients are combined well.


Tongue Scraper

A tongue scraper is an inexpensive tool that helps fight cavities by removing bacteria from the mouth via the tongue. By removing old residue on the tongue, it can improve taste sensitivity and reduce cravings [for example, if you eat something sweet, scrape your tongue immediately after to help reduce the craving for more sugar]. If you suffer from bad breath, it helps with that as well!

I really like the Preserve Tongue Scraper. It is made out of all recycled [and recyclable] content. To recycle you simply place it back in the original package and send back to the manufacturer for free.

[photo from the Preserve website]

And of course, brushing after each meal and flossing once a day!

Sunday, June 5, 2011

GRANOLA BARS

A few weekends ago, my husband, daughter and I headed up north on a much needed vacation. Having a food allergy [not to mention several] makes eating "on-the-go" a much more difficult affair. I have had enough experience to know that I need to bring my own food and plan for anything. One of the ways I have made this convenient is by making individually wrapped granola bars [remember to recycle the wrap if you can - The Tree Hugger Store recycles wrap]. This recipe can be adapted in many ways - I've provided some alternative ingredient combinations below [*].


1 2/3 c. oats [not instant]
1/2 c. sucanat or sugar of choice
1/3 c. oat flour [or grind oats to fine consistency]
1/2 tsp. salt
1/2 tsp. cinnamon
1 c. dried fruit*
2 c. nuts [lightly ground]*

1 tsp. vanilla extract
1/2 c. coconut oil [melted]
1/4 c. honey or maple syrup [I like honey for its thicker consistency]
2 tbsp. brown rice syrup
1 tbsp. water

Line an 8 x 8 inch glass baking dish with parchment paper [there should be enough paper to run up the sides]. Set aside.

Toss together all dry ingredients. In a separate bowl, mix wet ingredients. Pour the wet ingredient mixture over the dry and combine until the dry ingredients are coated well. Press mixture into prepared dish.

Preheat oven to 350 degrees. Bake at 350 degrees for 30 - 40 minutes or until edges are just turning brown.

Remove from oven and let cool for 30 minutes. Place in refrigerator for an additional 1 - 2 hours or until firm and cold [this will make the bars easier to cut].

Once completely cooled, pull the bars out of the dish using the parchment paper as "handles". Place on cutting board [with parchment paper]. Gently cut into squares or rectangles. Wrap each bar with plastic wrap or store all in a container in the refrigerator [if you are storing in a container, you can reuse the parchment paper to keep the granola bars from sticking to one another].

Alternative nut and fruit combinations:

*walnuts + sunflower seeds + toasted coconut + dried cherries + raisins
*walnuts + pumpkin seeds + 1 tsp. of pumpkin pie spice + sunflower seeds + dried apples
*almonds + cashews + dried dates + yellow raisins + regular raisins + dried currants
*cashews + sunflower seeds + sesame seeds + toasted coconut + semi-sweet chocolate chips
*walnuts + cashews + toasted coconut + lemon zest + dried blueberries
*walnuts + pumpkin seeds + sesame seeds + flax seeds + sunflower seeds + dried fruit mix

*you can also add 1/2 c. of nut butter of choice