Showing posts with label NUT FREE.. Show all posts

Wednesday, May 3, 2017

SPRING GREEN-ING SMOOTHIE with kale, pineapple, banana and parsley


Spring kicks me into smoothie mode. All winter I roast fruit and blend into warm concoctions but spring allows me to transform this routine into something a little less planned out, a little more random and a lot more green. Make this recipe as shown below and then begin to experiment. Add what you like, change up the fruit or juices, maybe throw in a few add-ins or test out some herbs. Maybe, just maybe, summon the courage to forage your yard for a dandelion leaf or two or saddle up the gloves and hunt down some nettle [FYI - blending well removes the sting].

Take your smoothie outside, enjoy the sunrise and toast to a new day.

[THE RECIPE]
Makes two 8 - 10 ounce servings

Note: using frozen fruit will give you a more common thick, frozen consistency whereas using fresh, room temperature fruit will allow for a gentle temperature but be more juice-like in texture. Adding avocado will thicken the consistency if that is desired.

1 cup frozen or fresh pineapple
1 banana, sliced frozen or fresh [optional]
1 large handful of chopped kale leaves or roughly 2 cups loose packed
1 tablespoon sunflower seed butter or nut butter of choice
1 1/2 cups milk of choice [dairy or dairy-free works here - I love tigernut milk and rice milk as both are lighter and more mild in taste]
1/2 - 2/3 cup pineapple juice [start with 1/2 cup and add more as desired to increase sweetness]

Optional Add-Ins / Substitutions:

1/2 cup fresh parsley
1/2 avocado
1 teaspoon maca powder
1/2 teaspoon bee pollen granules
1/4 teaspoon spirulina or chlorella powder
1 teapsoon chia seeds
1/8 - 1/4 cup hemp seeds
Sub one pear and pear juice for the pineapple
Sub chard for the kale
Small amount of fresh dandelion leaves
1/2 cup of strong brewed herbal tea
Small chunk of ginger and/or turmeric

Place all ingredients in high-powered blender and blend on high until very smooth and bright green. Taste and adjust as needed [add more fruit to thicken, more juice to sweeten, more milk to decrease sweetness].

Serve immediately. I've found this particular smoothie stores well in the refrigerator for at least a day more. Shake and enjoy again.


Tuesday, June 14, 2016

STRAWBERRY SHORTCAKE vegan, gluten free, nut free


I dug through the archives of this blog and realized I've never posted this recipe! This is one we look forward to every June and make without fail. The biscuits are soft and just the right about of crumbly, the strawberries fresh-picked at peak, and the cream the perfect way to top it all off. Enjoy!

[THE RECIPE]

For the shortcake:

1/2 c. non-dairy milk [coconut, hemp, tiger nut, rice, etc.]
1 T. apple cider vinegar or freshly squeezed lemon juice
1 1/2 - 2 c. oat flour
1 c. millet, buckwheat, or rice flour
1/4 c. tapioca flour
1/4 c. coconut sugar, finely ground to powder using Vita-mix, Ninja, or coffee grinder
2 tsp. baking powder
1/2 tsp. baking soda
1/4 tsp. sea salt
1/4 tsp. freshly grated nutmeg
1/4 tsp. ground cinnamon
4 T. semi-solid coconut oil

Combine milk and vinegar in small glass jar and set aside.

In large glass or stainless steel mixing bowl, stir together dry ingredients: flours, sugar, baking powder, baking soda, salt, nutmeg and cinnamon.

Add coconut oil and stir using spoon or hands until mixture becomes slightly wet and crumbly. Pour in milk, a little at a time, and beat with mixer or stir by hand until batter becomes dough like - able to form into ball and holding together. Add more flour or milk as necessary to find proper consistency.

Preheat oven to 375. Line cookie sheet with parchment paper [optional]. Form 2 - 3 inch balls with hands, place on cookie sheet, and gently flatten into patties. Continue until all dough has been used.

Bake until puffed and golden, about 20 - 25 minutes. Remove from heat and transfer to cooling rack.

Meanwhile, prepare strawberries. Rinse, remove stems, and cut into small slices.

Place biscuit in bowl and top with strawberries and whipped topping.

For whipped topping: 

2, 15-ounce cans of regular coconut milk, chilled or 4, 5.4 oz cans of coconut cream
1/4 c. maple syrup
couple pinches of sea salt

Chill coconut milk overnight to encourage separation of cream and liquid or use cans of coconut cream. Remove cans from refrigerator and open carefully. Using a spoon, gently dig out cream working to separate it from the remaining liquid. Reserve liquid to use in place of milk in shortcake recipe or for smoothies.

Place cream in mixing bowl. Add syrup and a couple pinches of sea salt. Whip on high using wire beater for about 60 seconds or until gentle peaks begin to form. Stop, taste, adjust as necessary, and whip for 20 more seconds. Pour into bowl, cover, and chill until ready to use.

Sunday, April 10, 2016

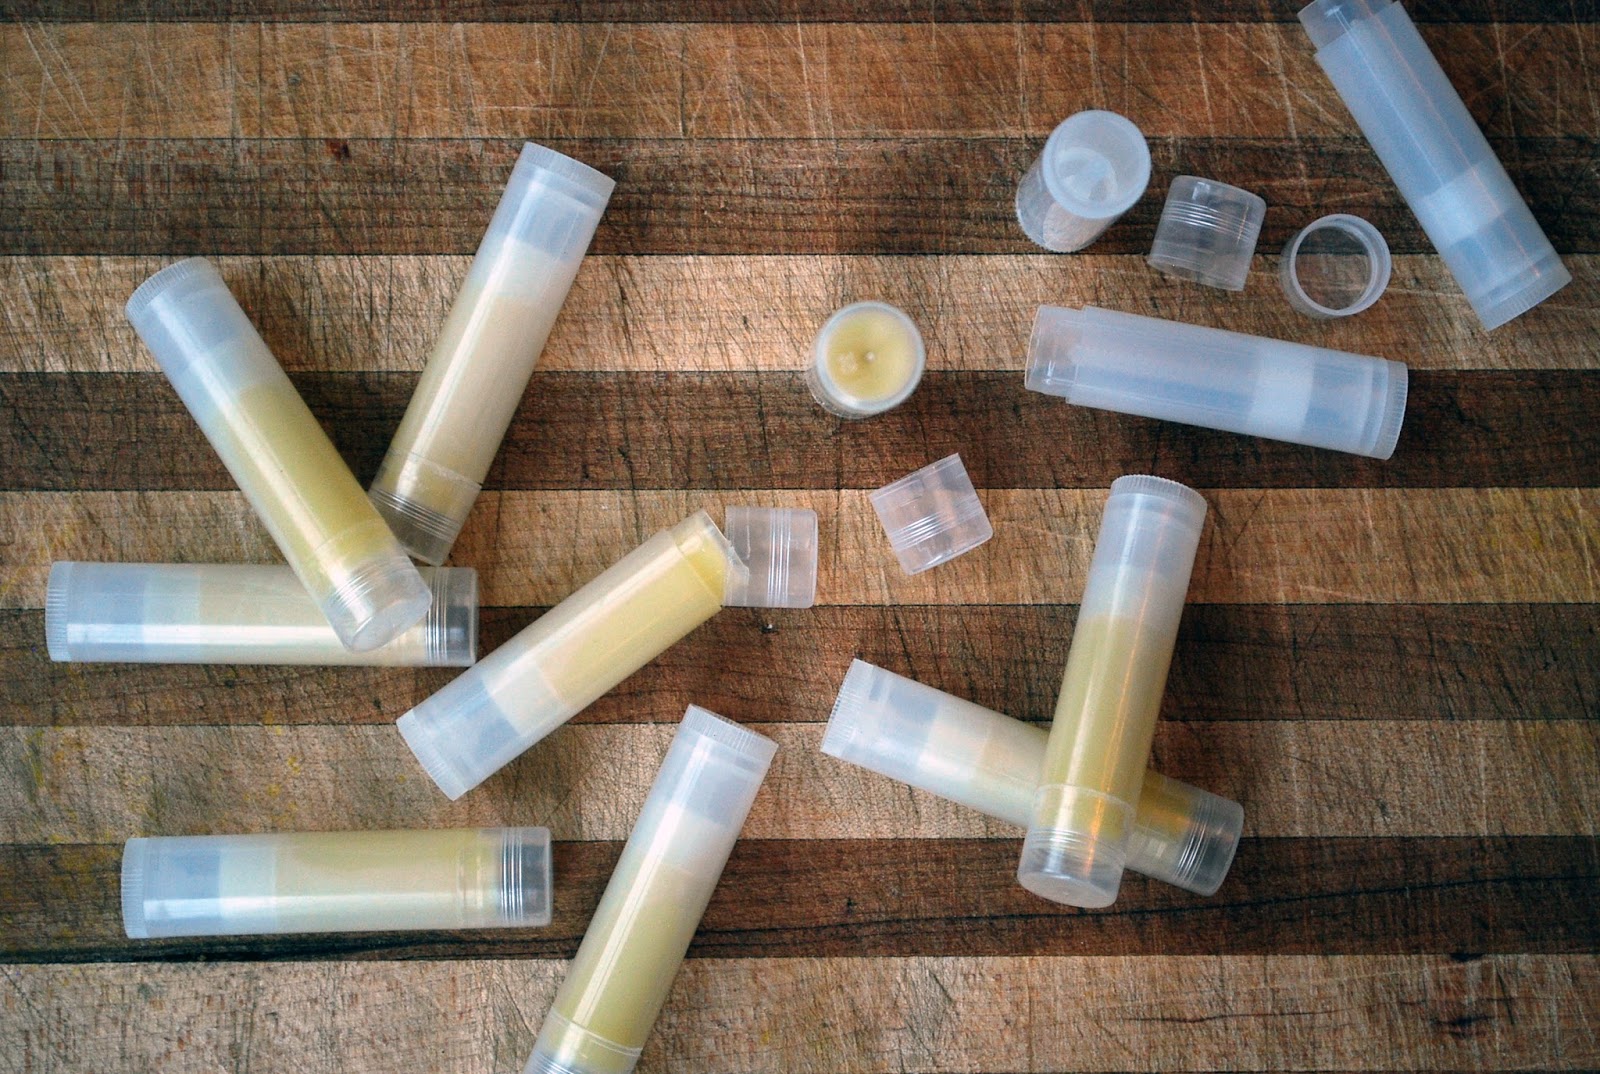
VELVET LIP BALM, SIMPLY

I love to play around with different beauty recipes and rarely purchase many in the store. I've found making my own lotion, lip balm, sugar scrub, masks, salves, boo-boo drops, and bath salts to be unbelievably easy, many completed in thirty minutes or less, some taking only minutes to create. It's a fun activity for my kids to join in on, getting to immediately experience the sweetness of their labors.

The Environmental Working Group [EWG] has put together a fantastic database of cosmetics and other beauty and body products. It's worth searching the items you use most frequently - the safety implications of many can be shocking [even some of the "natural" ones]. If nothing else, it provides us the opportunity to be educated consumers. Check out EWG's Skin Deep Cosmetics Database.

Purchasing the ingredients for this recipe is a small investment at first but will make many batches. The ingredients found here are repeated in many lotion and salve recipes as well. Store oils in a cool place to extend life and maintain quality. Below I have linked each ingredient to its description at Mountain Rose Herbs. You can purchase high quality ingredients there or find them on Vitacost and Thrive Market. Check out Return to the Garden's library under "Dive Deep / Herbal Medicine" for more resources on making your own beauty products.

This is the lip balm recipe I've landed on. Thick but light. Smooth. Rich. Velvet.

[THE RECIPE]
Makes approximately 11 tubes of chapstick

11 - 12 empty plastic lip balm tubes [you can purchase or reuse]
1/2 oz. beeswax, pastilles or chopped
1/2 oz. shea butter
1/2 oz. jojoba oil [appx. 2 tsp]
1/2 oz. coconut oil
1/4 oz. castor oil
1 tsp. vegetable glycerin
1/4 tsp. vitamin E oil
10 drops peppermint essential oil or essential oil of choice

Set up double boiler or create your own by filling a small pot one third of the way with water. Place a heat proof bowl on top.


Combine all ingredients, except peppermint essential oil, in bowl and bring water to boil over medium heat. Stir frequently.

Once completely melted, remove from heat and add essential oil stirring until completely integrated.

Use a spoon to carefully pour oil mixture into lip balm tubes or container of choice, filling to the top. Cool completely. Cap and wipe any excess lip balm off tube.

Store at room temperature for up to six months. Use as needed.

Thursday, October 8, 2015

PEAR + BLUEBERRY CRISP with cardamom and ginger


The other day I made a visit to an acupuncturist I see fairly regularly. I may have just lost you there - that needle thing, ya know? Gave me the willies too.

But then I went and it worked and I'm hooked.

On this particular visit, I walked in and immediately started in on a "I love fall so much but my body hates it!" tirade [my kids get their drama from my husband, I swear!]. My skin is dry, my bones are dry, my organs are dry - everything is dry, dry, dry. Except my nose - that's running like an allergy-induced faucet. She patiently sat there and listened, shared a wealth of her knowledge and experience, pinned me, and wrapped up with instructions to "eat more pears. Oh, and dates and fats too". Chinese medicine is brilliant y'all.

In good student fashion I came home with a bag of pears, opened my cupboards, and got to work. I shivered with anticipation as I combed together ingredients. It was as if my body could feel the nourishment before it physically received the nourishment. And here's the kicker - in a moment of intuition bliss I actually wrote the recipe down as it came to me. People, this never happens!

It turned out good. Really good. Breakfast, lunch and dinner good.

So here it is - may food be thy medicine.

Many fall blessings friends.

[THE RECIPE]

For the filling:
5 - 6 pears
4 c. blueberries, fresh or frozen
1 1-inch piece of fresh ginger, minced
8 medjool dates, pitted and chopped into small pieces
1 c. water
1/2 c. pure pear juice

For the topping:
2 c. whole, gluten-free oats
2 c. whole, gluten-free oats, roughly ground
1/2 c. coconut sugar
1 tsp. sea salt
1/2 tsp. cardamom
1 c. coconut oil
1/2 c. pure [local if possible] maple syrup

Peel, core, and thinly slice the pears. Place in a 9 x 13 inch glass baking dish. Add blueberries, minced ginger, and chopped dates. Mix with your hands. Add water and juice. Set aside.

Preheat oven to 350 degrees.

In a large glass bowl mix together oats, sugar, sea salt, and cardamom. In a small saucepan melt coconut oil and maple syrup over low heat. Once the oil has completely melted pour it into the oat mix and stir to combine.

Spread evenly the oat topping of the fruit filling.

Bake at 350 degrees for 45 minutes uncovered. After 45 minutes, cover with tinfoil and bake another 15 minutes. Remove from oven and set aside to cool for 15 - 20 minutes before serving.


Monday, October 5, 2015

MASOOR DAL with onions and garlic

Today I found myself thinking, “If only we didn’t have to eat. I could get so much more done.”

Uh oh.

We were just back from a 10-day trip and woke up late [vacation-lag], finding ourselves rushing somewhat frantically throughout the morning, just trying to make it out the door with hair combed and shoes on. Food was the last thing I needed to be bothered with.

I've learned, with a lot of practice, to watch these kind of thoughts with curiosity. It came from somewhere within me and is probably less about what I actually think and more of a red flag gently warning me something is off. 

I watched and waited.

Pretty quickly I stumbled upon this: I was feeling rushed and out of control, unprepared and unsettled. My body and soul were at work, signalling my mind for a time of slow. Interestingly body/soul chose food as the medium, something I deeply care about. The point was so blatant, so obvious I had to listen. Give up food? Yeah. Right.

I wonder if the act of eating – the process of growing, storing, and preparing food is actually meant to slow us down. The act of creating anything really - food, music, tangible art, literature, children - all of it begs us to slow our steps. It tries to connect us to a more sustainable, livable pace. 

In the same way the seasons can act as a guide if we allow them. Right now the high summer energy is transitioning to the more hibernation-like energy of winter, a time to re-coup from summer. I think our daily meals can show us a similar pattern. Chew or gulp anything really quickly, especially while traveling in a moving vehicle or in a state of anxiety, and you’ll soon find yourself suffering bloat, heart burn, indigestion, constipation, and abdominal pain. Chew slowly and intentionally a meal prepared with care and you’ll find yourself nourished and connected in a deep way. Not a new theory, however I need to be reminded of most things 70 times 7 to finally grasp the importance. 

Hmmmm. 

After a school pick-up, I settled my youngest in for a nap and took my oldest upstairs. We turned on music, shared kombucha, and painted together. We left everything urgent and delved into the truly important - finding meaning, purpose, beauty, and excitement in the now. We slowed down and created something. I listened to the soul within me and entered into an extremely holy moment. My world slowed down to one breath at a time, one brush stroke at at time, the sweet smiles and sacred glances from my child. 

My shoes were off. I was on holy ground.

The more I listen to the whisper within me, the more I find power and transcendence within the slow, the quiet, the creativity in the daily. 

After four hours had flown by and we set our paintbrushes down, I headed to the kitchen to cook dal. Simple ingredients, slowly cooked. Nourishing, warm, holy. 

May you begin to be curious about the thoughts that pop up throughout the day. May you enter into conversation with them as if old friends are stopping by, ones who know you quite well. May you create time to create simply for the sake of creating and, in the process, may you happen upon holy. 

[THE RECIPE]
Serves 6 - 8
Adapted from Rodale's Organic Gardening Masoor Dal

4-5 T. extra virgin, unprocessed coconut oil
1 large onion, finely chopped
4 - 5 garlic cloves, minced
1 1/2 T. whole cumin seeds, dried
2 tsp. ground turmeric or 2 T. fresh turmeric, minced
2 - 3 tsp. sea salt
2 tsp. ground coriander
1 tsp. sweet paprika [and/or 1/4 - 1/2 tsp. cayenne for spice]
2 c. split red lentils [or masoor dal]
6-7 c. water
1 can regular, full-fat coconut milk [optional]
fresh cilantro, minced
cooked basmati rice

Begin by placing the lentils in a mine mesh strainer. Place under running water. Rinse the lentils until the water coming from the strainer runs clear [or really close to clear]. Set aside.

In a large stainless steel pot, melt coconut oil over medium-low heat. Add minced onions to the oil and stir to coat the onions with the oil. Cook until onions are translucent and beginning to soften [adjust heat as necessary to prevent browning]. Add cumin seeds and garlic. Saute 1 - 3 minutes or until cumin is slightly toasted and fragrant. Add turmeric, salt, coriander, and paprika. Stir to thoroughly combine. Stir in lentils and water.

Increase heat to medium-high and bring to a simmer. Reduce heat as necessary to retain small simmer. Cook uncovered until the lentils are very soft and consistency is a little thicker than a creamy soup, stirring occasionally [approximately 30 - 45 minutes]. If it becomes to thick, add water in 1/2 cup increments. Once the lentils are fully cooked, add coconut milk if you are using [milk is completely option - with or without is delicious].

Serve over a bed of basmati rice and garnish with fresh cilantro.

Thursday, July 23, 2015

TURKEY SALAD [EGG, NUT, GLUTEN, AND DAIRY FREE]

One of my favorite restaurants has an amazing chicken salad I crave from time to time. This is my
homemade dairy, soy, and egg-free attempt to satisfy a craving and use up a turkey I had tucked away in the freezer around Thanksgiving.

[THE RECIPE]

1 c. water
1/2 c. hemp seeds
1/4 c. olive or caper juice [optional]
3 T. dijon mustard
2 T. raw honey
1 lemon, juiced [about 2 T. lemon juice]
1 - 2 garlic cloves, peeled
1 tsp. sea salt
1 tsp. sweet paprika
1/2 tsp. onion powder
1/4 tsp. turmeric powder
1/4 tsp. smoked paprika
freshly ground pepper, to taste
2 c. extra virgin olive oil
1/2 - 1 c. loosely packed fresh dill leaves, stems removed, to taste
1/4 c. loosely packed fresh chives, finely chopped
breasts of one turkey or two chickens [organic, pasture raised, local if possible], roasted* or cooked and shredded

In a high-speed blender, combine water, hemp seeds, olive or caper juice, dijon mustard, honey, lemon, garlic, salt, paprika, onion powder, turmeric powder, smoked paprika, pepper, and oil. Blend on high until very smooth and creamy. Taste and add salt or pepper as needed. Set aside.

1/2 - 1 c. thinly sliced radishes
1/2 - 1 c. thinly sliced celery

Fill a medium bowl 3/4 of the way full with water and ice. Set aside. Bring water to boil in a medium stainless steel pot. Add radishes and celery and blanch for 1 minute in boiling water. Remove vegetables and place in ice water. Let cool for a couple minutes and then strain.

In a large glass bowl, combine cooked and shredded turkey or chicken and blanched vegetables. Slowly add prepared dressing a 1/2 cup or so at a time until the meat and vegetables are thoroughly covered. Serve warm as sandwich, on a bed of greens, or on a bed of kale rubbed with a little olive oil to soften or refrigerate until ready to serve. Garnish with raw sauerkraut, olives or capers, toasted nuts or seeds, avocado, pickles, etc.

*[ROASTED TURKEY]

1 lemon, washed and cut into wedges
1 large handful each of fresh dill and chives
1 - 2 T. extra virgin olive oil
2 tsp. sweet paprika
1 tsp. smoked paprika
1 - 2 tsp. sea salt
1/2 - 1 tsp. freshly ground peppercorns

Thaw turkey in refrigerator. This may take a few days so plan ahead. Prior to baking, remove bag of giblets from inside of turkey. Place the bird in a large glass baking dish and rub whole turkey with a little olive oil, paprika [sweet and smoked], sea salt, and freshly ground pepper. Stuff inside cavity of the bird with the lemon wedges and fresh herbs

Fill baking dish with 2 - 4 cups of water or enough to have about 1/2 inch of water in the bottom of the dish..

Cover entire dish with tinfoil and roast at 325 degrees F for 2 - 3 hours or until the inner temperature [thermometer in thigh] reaches 165 - 170 degrees. Uncover for last 15 minutes.

Remove from oven and let stand at room temperature for 20 minutes to cool enough to slice.


Thursday, July 2, 2015

VEGAN PANNA COTTA WITH MIXED BERRY COULIS


Over the next week or so my family will be celebrating two rather big days: the first being in honor of this country we call home and the second, a birthday for my first born baby, now entering into the BIG 5th year. Similar to loving the act of celebrating the birth of a person, I cherish that we pause as a country one day a year to reflect on the freedoms we enjoy, most without much thought on a regular basis. In light of many of the devastating events that have occurred within these borders over the last month or so, I think it is vital to remember we live in a land founded on the dream of a better future. It is more important, now more than ever, to continue to heal the brokenness hidden within the cracks of the land and souls of the people.

And I think it's essential that on this day, this fourth of July, we take a moment to say:

Hey, we live in a country where we are able to make choices, and mistakes, and differences and this is awesome. We live in a country where we vote and have discussions and debate and give our opinions and this is an incredible gift and responsibility. We live in a country of wealth and land and beauty and have the ability to give freely and help and pray and sit in wonder. We can choose our faith and schools and doctors. We can follow our dreams and have opportunity even when it all falls apart. We can travel and be welcomed home. We have big problems and small but we also have amazing minds and courageous voices who are working tirelessly to encourage us all to do better - to care more about others and the world around us. We experience pain and heartache and beauty and joy, sometimes all in a matter of minutes, and we have the people around us to walk with us through it all.

I'd say this is worth celebrating. For one day I encourage us to hang up the political chatter and lay down our nasty online grenades. To surround ourselves with the people we love and drink champagne and eat dessert and big green salads and enjoy the fruits of our land. To find a body of water to swim in for hours and remember to say thank you because clean water isn't something to take for granted. I urge us to stay up late and watch the sunset or admire the fireworks. I challenge us to be present and pause and, rather than thinking of all the ways we and this country fall short - all of the destruction and damage and heartache we've caused - to instead remember the ways we've given and changed and healed and shown the world we are kind and compassionate and work for all to experience the freedom we do today.

And then I hope we enter into July 5 with a new sense of unity and humbleness and the drive to leave exclusion and segregation in history, exactly where it belongs. Be brave and share a message of love. Take courage and look at the darkness within the confines of your own soul. Let's face our own demons in an effort to bring a little more peace to this world. And may we pause and give thanks - celebrating summer and freedom, grace and redemption.

Happy Independence Day, friends.


A few years ago I was introduced to a coconut milk version of panna cotta and fell for it immediately. I love the creamy texture, the light dessert taste, the summer of it all. So in thinking of a special treat for this upcoming country-wide holiday, I immediately went to this. It's simple, light, and a lovely way to end a meal.


[THE RECIPE]

If your curious about tigernuts [and why their not actually nuts!], head over here

For the Panacotta:

1 c. tigernuts [I've used Gemini as well as Tiger Nuts]
2 1/2 c. room temperature water
OR substitute 4 cups of any milk of choice [thicker milks work best like coconut milk]

1/4 - 1/2 c. pure [local if possible] maple syrup, adjust to fit your taste
1 vanilla bean, scraped [check out this video for instructions] or if you come across a dry bean, toss the whole thing into the blender
1 - 2 pinches of sea salt
a large pinch of cardamom powder
3 tablespoons pure gelatin

Place silicone muffin cups on a small cookies sheet or serving platter. You can also us small glass bowls or jars as well.

Note: If the idea of making your own nut milk sends you into a mild panic, check out this video first. It will hopefully dispel all your fears and insecurities!

Place whole tigernuts in a blender and cover with water until the liquid reaches the three cup mark [this is approximately 2 1/2 cups of water]. Blend on high for a minute or until the liquid is white in color and very smooth. Place a nut milk bag in a glass bowl or four cup measuring cup in the sink. Carefully pour the nut milk into the bag. Gently lift up the bag and twist at the top to make sure none of the liquid squirts out. Once the top is secure, squeeze the bag slowly [all the while hold the top of the bag tightly closed] until all of the liquid has been pressed from the pulp. Set pulp aside and rinse out the blender.

In a small saucepan very slowly warm the milk to just higher than room temperature [warm to touch]. It is really important to watch as heating it too much will cause it to gel.

Return the warmed milk to the blender container and add syrup, vanilla bean seeds, salt, and cardamom to the milk. Blend on medium. Turn blender speed to low and slowly pour in the gelatin powder. Blend on low for an additional thirty seconds or so.

Pour this liquid immediately into the silicone muffin cups or greased glass bowls. Place in the refrigerator for about two hours - overnight. To speed up the process you can put the panna cotta in the freezer for about thirty minutes or until it is firm but be sure to remove before it freezes.


For the Coulis:

I'm taking a bit of a liberty [in honor of the holiday of course!] calling this coulis, as most traditional coulis' are strained. I prefer it a bit chunky so I skip that particular step but you could run the cooked berries through a blender and then strain the pulp if you choose.

4 c. of berries of choice, fresh or frozen [I used equal parts strawberries, blueberries, raspberries, cranberries, and sour cherries]
juice of 1/2 a lemon or about 1 T. of fresh juice
pinch of sea salt
1/4 - 1/2 c. pure maple syrup or raw honey, local if possible [adjust to taste]

In a medium size stainless steel pot, warm berries over medium-low heat. Cover and allow to soften into a jelly like consistency, stirring frequently. Once the berries have become very soft, gently smash any whole berries with a fork or immersion blender. Add remaining ingredients and stir. Cook over low heat for an additional 5 minutes. Remove from heat and set aside to cool.

Wednesday, April 15, 2015

CROCK POT APPLE CRISP: GOOD ENOUGH FOR BREAKFAST OR DESSERT!


Today I spent the larger portion of my day under a big blue sky and ended lunch with this crisp - warm and fresh, just like the sun. There is nothing like meditating on a paddleboard, walking in freshly greened grass, digging in dark, rich dirt, or swinging as high as you can for no other reason than the simple joy it brings. Throw these ingredients in the Crockpot [prep takes all of 10 minutes] and get yourself outdoors!


[THE RECIPE]

Fruit Filling

6 c. blueberries [frozen or fresh] or fruit of choice
1 tsp. ground Ceylon cinnamon
1 T. arrowroot or tapioca starch
1 T. freshly squeezed lemon juice
3 T. coconut sugar

Crisp Topping

2 1/2 c. old fashion rolled gluten free oats
1 1/2 c. oat flour
1/2 tsp. ground cardamom
1 tsp. ground ginger
1 tsp. sea salt
1 c. coconut oil
1 c. maple syrup or raw honey
optional additions: chopped nuts, dried fruit, ground ginger, ground nutmeg, ground cardamom

Mix fruit filling ingredients together in 6 quart or larger Crock Pot.

In a large glass or stainless steel bowl, combine oats, oat flour, cardamom, ginger, and any optional additions you choose. In a small saucepan melt coconut oil, sea salt and sweetener of choice over low heat. Once the oil is completely melted, pour into oat mixture and stir until all the ingredients are well incorporated. Spread this crisp topping over the blueberry mixture in the Crock Pot.

Cover and cook on high for two hours or low for 4 hours or until blueberries are very tender and bubbling. Turn off the heat and remove the cover. Let the crisp cool in the Crock Pot for 30 minutes or until the topping has hardened just a touch.

Serve alone or with whipped topping / ice cream of choice and enjoy!


Friday, March 20, 2015

SPRING FIRST LAYERED JELL-O GUMMIES

Happy Spring First!

What, might you ask, is Spring First?

Well, it's the first day of spring of course! And the perfect day to celebrate.

In our home, my girls look for any and every reason to have a party, maybe receive some presents, and celebrate all day long. We make a big deal of absolutely every holiday and throw in a couple made up ones as well.

Today is such day. After giving a nod to Franklin the Turtle [from whom we were inspired], we got right down to the business of par-ttt-yyyy-ing!

Waffles? Check. Potatoes? Check. Bubbles? Check. Chalk? Check. Layered spring-inspired Jell-O? Check. Grandparents? Check and check. And this only takes us to 11am. The day sort of unfolds as it will as we follow our present desires and dreams for what this holiday should hold. No planning. No fuss.

Our only rules?

Simple, smiles, and sunshine [the sunshine being negotiable].

Here's the thing about made up holidays: they give the present a special magic and adventure. A normal day becomes anything but normal, yet it's the normalcy that makes it so wonderful.

So take a day, make it a holiday, and celebrate like you really, really mean it. Do whatever comes to mind and don't think about anything else. Go outside and play like a child or drive to the beach or find some swings.

Whatever you do, smile because you're making normal so very beautiful.

Happy Spring First everyone!

[THE RECIPE]

Note: We like our jell-o a little on the tart side but if you prefer sweet [for picky eaters this may be helpful], feel free to add maple syrup or honey as desired.

To begin, prepare an 8 x 8 inch glass baking dish by rubbing a thin coat of coconut oil along the entire inside of the pan to grease. Set aside.

I warm all of the layers in separate pans at the same time prior to pouring into the baking dish but it also works to get the first two layers prepared, pour one into the pan to chill, and start working on the third and fourth layers.

If you don't have the fruit I've listed on hand, simply sub in any other fruits. Mango, and blackberries, strawberries all work well. The only fruit to avoid is pineapple as it reacts with the gelatin resulting in mush.

First Layer:

2 c. frozen blueberries
1/2 c. cranberry juice
1/2 freshly squeezed lemon juice
pinch sea salt
maple syrup [optional], to taste
7 T. gelatin powder

In a medium size saucepan over medium-low heat, combine berries, juice, lemon juice, salt, and syrup if using. Cook until warm and berries are have soften just a bit. Turn off heat and pour berry mixture into a blender. Blend on low. While the blender is running, slowly add gelatin powder. Replace the blender top and blend on high until mixture becomes creamy and smooth. Pour mixture into the prepared 8 x 8 inch baking dish and place in the freezer for about 10 - 15 minutes or until just firm but not hard.

Second Layer:

1 c. Tigernut or coconut milk
1 T. vanilla extract
3 - 4 T. maple syrup
1/2 - 1 T. lucuma powder [optional, this adds a malt-like flavor]
pinch sea salt

In a medium size saucepan over medium-low heat, combine milk, vanilla, lucuma powder, salt, and syrup. Cook to warm. Turn off heat and pour mixture into a blender. Blend on low. While the blender is running, slowly add gelatin powder. Replace the blender top and blend on high until mixture becomes creamy and smooth. Pour mixture evenly over the first layer and return to the freezer for about 10 - 15 minutes or until just firm but not hard.

Third Layer:

2 c. frozen raspberries
1/2 c. pear juice
maple syrup [optional], to taste
7 T. gelatin powder

In a medium size saucepan over medium-low heat, combine berries, juice, and syrup if using. Cook until warm and berries are have soften just a bit. Turn off heat and pour berry mixture into a blender. Blend on low. If you'd like to remove the seeds, pour the mixture through a fine mesh strainer using a spoon to gently push it through. Rinse out the blender and return the raspberry puree to the blender. While the blender is running, slowly add gelatin powder. Replace the blender top and blend on high until mixture becomes creamy and smooth. Pour mixture over the first two layers and return to the freezer for about 10 - 15 minutes or until just firm but not hard.

Fourth Layer:

2 c. frozen apricots
1/2 c. apricot juice
maple syrup [optional], to taste
7 T. gelatin powder

In a medium size saucepan over medium-low heat, combine apricots, juice, and syrup if using. Cook until warm and apricots are have soften just a bit. Turn off heat and pour apricot mixture into a blender. Blend on low. While the blender is running, slowly add gelatin powder. Replace the blender top and blend on high until mixture becomes creamy and smooth. Pour mixture over the first three layers and either return to the freezer to firm completely [about 20 minutes] or place in the refrigerator for 1 - 2 hours.

When the jell-o is completely firm, cut it into small squares using a sharp knife. Gently pull from the pan and tear apart where needed. Store in a tightly sealed glass container in the refrigerator for 1 - 2 weeks.

Wednesday, March 11, 2015

FINDING A HOLY PLACE AND THE ONLY TWO GLUTEN-FREE BREADS I EVER MAKE

The other day it was warmer than it has been in months. It was 40 degrees and sunny and beautiful. If you live in the Northern hemisphere you may know of a specific phenomenon that happens on the first warm day of the year - on the day that follows months of cold and winter and quiet and burrowing in.

Everyone around you comes out of hibernation and the sense of communal happiness and relief and energy is palpable. We wear t-shirts and shorts, roll down our windows, and can't help but smile at everyone we see.

It was on this day I drove out to the lake, to my Holy Place, to celebrate the coming of spring and the gratitude that comes with it.

Here's what I mean by Holy Place:

It's the first spot that comes to mind when I'm overjoyed or devastated with grief or consumed with anger and confusion. It's where I go to work through emotions, think through my deeper thoughts, meditate, or simply sit and watch. I take my kids sometimes but most often go alone or while my youngest naps in the car. Sometimes I bring things to do and on other occasions I play the music really loud. Sometimes I just sit and soak up the silence.

This spot beckons in a more powerful way when the days are short and temperatures keep me cocooned indoors. I drive out to my Holy Place when it's almost blindingly sunny yet the air has an icy chill and the wind is biting. There, in my spot, the world seems so large and luminous while at the same time filled with peace and balance.

It's my Holy Place because it's the space where I most strongly sense the presence of God and the Spirit within myself. It connects me to something larger than me yet grounds me to the present moment happening immediately around me. 

It's the space that embraces me as me - no projections, no demands, no expectations.

No matter what baggage or praise I bring to this place, it accepts me. And it reminds me that life is larger than most of the chatter in my head yet is as small and intricate as the tiniest grain of sand.

Here's the thing - I didn't always have a Holy Place. In a way it sort of found me. One day, a normal kind of day, I had this intense feeling I needed to drive out to the lake. I didn't know why but followed it's call. Ever since, this place keeps pulling me back to remind me that we live in a holy, beautiful, unbelievably large, and unbelievably small, world. And to help me remember to live in the present moment as if it is the most precious gift. I have been changed by this space - this very regular spot I call holy and claim as my own.

And that's the gift isn't it?

Any place can be holy if you have eyes to see and a heart ready to experience it's wonder.

May you find and notice and answer the call of your Holy Place and may it connect you to this deep well of love and acceptance and grace that is yours for the taking.  


[THE RECIPES]

Here's why I love these recipes. First, both are unbelievably simple with a short ingredients list. Clean up is a cinch which is important to me. I'm not particularly in love with baking. To take on the task and have major clean up after is mostly more than I can handle and will quickly talk me out of the recipe before I begin. These recipes take a bowl or mixer bowl, blender [opt.],  one teaspoon, one tablespoon, a measuring cup, and maybe a spoon. Baking bliss.

CHEWY OAT BAGUETTE BREAD

This bread is great for sandwhiches, French toast, croutons, breadcrumbs, and really is a great multi-purpose bread.


Notes: 

I find that putting the water, milk, and vinegar in a blender or mixer, and then slowly adding the psyllium husk powder while it's running on low - medium makes a better [less chunky] gel. 

For a molasses or dark style bread, I replace the honey with molasses. 

Once I've mixed the dough, I let it sit for a few minutes while I clean up the very minimal dishes [seriously, less than 5 minute clean up]. I find this firms even dough that is a little on the wetter side and gives me a better gauge for adding additional flour. 

I almost always double the recipe. After the loaves have cooled, I thinly slice and freeze one of them.

 LIFE-CHANGING SEED BREAD

This bread makes awesome whole-grain style toast, especially with seed butter and raw honey or a favorite jam.

Notes:

I use pumpkin seeds in place of hazelnuts [for a nut-free option] and like to really grind / finely chop the pumpkin and sunflower seeds to a chunky flour. 

I like to use quinoa flakes in place of oats. I find this makes a bread that sticks together better than with the oats but really both work great.

I almost always double the recipe. After the loaves have cooled, I thinly slice and freeze one of them.

I've found that making a double batch can be useful in another way. This recipes asks you to really press the dough down into the bread pans. I use the extra loaf pan to press on top of the dough [place a piece of parchment on top of loaf being pressed]. It seems to give me more leverage and force. 

When the recipe calls to remove the bread from the pan and continue to bake, I place them loaves on a cookie rack rather than directly on the oven rack. It makes for an easier removal of the loaves from the oven.


Monday, October 20, 2014

SIMPLE PIZZA CRUST


My girls, like their father, love pizza. When I say love I mean LOVE. I've tried a host of pizza crust recipes ranging from a cauliflower to bean base. From gluten-free flour blends and yeast to straight from a box. Each time they came out okay. You know, edible. An occasional visitor but not necessarily a mainstay at our table.

Then I came across a recipe from Julie Morris in her book Superfood Kitchen and wondered if maybe she had hit on something grand. It's really simple with a minimal ingredients list, something lacking in many of the other recipes. Of course I needed to adjust some ingredients based on our family's specific dietary needs. I subbed different grains for rice flour and sneaked in a bit of squash for the beans.

And then, I held my breath and gave it to my two little [tough!] judges. They plowed through five pieces each. I'd call that success.

[THE RECIPE]
Adapted from Superfood Kitchen by Julie Morris
Makes One Pizza Crust

1/2 c. sorghum, quinoa, or buckwheat flour
1/4 c. flaxseed powder
3/4 tsp. sea salt
1/2 tsp. garlic powder
1/2 tsp. dried oregano
1 T. chia seeds
1 1/2 c. buttercup squash puree*
3 T. water

Mix all of the dry ingredients in a medium-size bowl. Add the squash puree and water and mix well using hands, a spoon, or a mixer [I find a mixer works best here but use whatever you have]. Let sit for 15 - 20 minutes.

Preheat oven to 375 degrees.

Gently spread dough out on a parchment-lined baking pan or pizza stone. Smooth to a 1/4-inch thick. If the dough gets sticky you can sprinkle extra flour or wet/oil spoon or hands.

Bake for 20 minutes.

Remove from oven and add toppings of choice [I show pesto with shredded goat cheese here]. Bake for an additional 5 - 10 minutes or until everything is cooked to your preference.

Cut into squares and serve immediately.