Showing posts with label SALAD.. Show all posts

Thursday, March 14, 2019

DILL CHICKEN SALAD with celery, apples, and sunflower seeds


Spring is in the air. And the ground. The snow is melting, the sun is shining, and thunderstorms grace the skies. It's a glorious time - my favorite in fact. Lately I've been craving chicken salad. Light yet substantial. Versatile and at the ready for park time, bike rides, and all the outdoor fun that comes with this season. Enjoy!

[THE RECIPE]

1 - 1.25 lbs chicken breast (I love Creswick Farms chicken), cut into large chunks or strips (2 15-oz cans of garbanzo beans to make vegan)
2 tablespoons of ghee or butter (avocado or algae oil for vegan)
sea salt and freshly ground pepper

1 cup celery, chopped into small chunks
2 small or 1 large sweet apple, chopped into small chunks
1/2 heaping cup of raw sunflower seeds
1 tablespoon of dried dill or 1/4 cup fresh dill leaves
1/2 cup vegenaise or mayonaise (I love Soy-Free Vegenaise or Chose Foods Avocado Oil Mayo)
Freshly ground pepper, to taste

In a large cast iron or stainless steel skillet, melt ghee or butter (or oil). Gently spread chicken (or garbanzo beans) out in pan and sprinkle with salt and pepper. Cook over medium heat for about 5 - 7 minutes. If using garbanzo beans in lieu of chicken, shake the pan over the burner from time to time to stir. When the pan side of the chicken begins to brown, flip and cook another 5-7 minutes until browned. Cut into a slice of chicken to make sure it is cooked all the way through. Turn off heat and let cool for 10 minutes.

While chicken cools, combine celery, apples, sunflower seeds, pepper, and dill in a large glass or stainless steel bowl. Mix well.

Chop the chicken into really small pieces (lightly crush garbanzo beans if using). Add the chicken and vegenaise/mayo and stir until all of the mixture is coated evenly. Serve immediately or store in refrigerator for up to a week.


Wednesday, May 3, 2017

CARROT SALAD with garbanzos and chili-lime dressing


This is a recipe born out of my desire to enjoy one of my favorite restaurant's salads at leisure. I find it to be a great spring go-to. Light and fresh yet maintaining a certain kind of density that is satisfying without dropping like a boulder in the gut. The best part? It get's better with age. Make the full batch as shown below and enjoy all week. Play with different ways to garnish and test a few base grains. Take it outside, sit in the grass and soak up all the earth has to offer.

May spring fill you with random creativity and the feeling of being fully alive.

Peace.

[THE RECIPE]

20 medium to large carrots, peeled and thin-sliced at a diagonal
15-ounce can of garbanzo beans [I love Eden brand] or 2 cups homemade
1/2 red onion, cut in half and finely sliced
6 radishes, cut in half and finely sliced
1 heaping tablespoon ghee or avocado oil
sea salt
ground pepper

Bring to boil a medium size pot of water. Add sliced carrots and blanch for two minutes. Eliminate heat, pour carrots into a strainer over sink, and rinse with very cold water. Let sit for 5 - 10 minutes to allow water to fully drain.

Meanwhile, dump garbanzo beans into a fine mesh strainer and rinse well with cold water over sink. Shake to remove any remaining water. Heat 1 heaping tablespoon of ghee or avocado oil in a large skillet or frying pan. When hot but not smoking, carefully add garbanzo beans and sprinkle with salt and pepper. Shake pan frequently to stir. Sauté for 3 - 5 minutes or until beans just begin to show golden brown. Remove from heat and let cool in pan for a few minutes.

Place carrots, sautéed beans, onion, and radishes. Gently mix with wooden spoon. Add half of the dressing and stir until dressing thoroughly coats the vegetables. Taste and add more dressing as needed.

For best results, make a day in advance and refrigerate over night. Serve room temperature over a bed of rice or quinoa and garnish with toasted almonds, fresh cilantro or parsley, avocado, and remaining dressing.

For the Dressing:

1/4 cup maple syrup [more to taste]
juice of 4 limes
2 - 3 teaspoons of chili powder
1 teaspoon cumin powder
1 teaspoon garlic, minced
salt, to taste [start with 1/2 teaspoon and add as needed]
ground pepper, to taste
1 loosely packed cup fresh cilantro leaves
3/4 - 1 cup avocado oil or olive oil

Place all ingredients except oil and cilantro in a blender or medium size glass jar with tight fitting lid. Blend on low-medium to combine or shake well for 1 - 2 minutes. If using blender, turn on low and slowly drizzle oil into blender container until dressing begins to thicken. Dressing consistency should be more than watery yet not thick. Add cilantro and blend on medium-low to combine. Cilantro should look like small flakes. If your using a glass jar, add oil and shake for 2 minutes until dressing thickens. Add finely chopped cilantro and shake once more.

Thursday, November 17, 2016

HOMEMADE BALSAMIC VINAGRETTE


This is my go-to, "good for any occasion and makes everything taste better" dressing. It's the one I've made so many times, I've given up measuring the ingredients and let my eyes and tastebuds take the lead. The one thing I'm a stickler about in this recipe is the balsamic vinegar. There really is no substitution for Napa Valley's Reserve Balsamic. The consistency is reminiscent of molasses and takes a bit to get out of the bottle but the texture it creates when combined with the other ingredients is that of a thick syrup. And no, I'm not getting paid to say this. I have no connection to the company. In fact, rarely do I advocate for a particular brand unless is absolutely affects the outcome of the recipe or presents a quality issue. This is one of those infrequent times. 


[THE RECIPE]

1 cup extra virgin olive oil
1/2 cup balsamic vinegar [Don't sub another brand, it has to be this one. Trust me.]
1/2 cup pure, raw honey
1/4 cup apple cider vinegar
1 heaping tablespoon Dijon mustard
1/4 - 1/2 teaspoon finely ground sea salt [start with less and add more as needed]
1/4 teaspoon freshly ground pepper
1 tablespoon fresh or 1 teaspoon dried thyme

Place all of the ingredients into a glass quart jar. Secure the lid tightly and shake vigorously for a couple minutes until the mixture is like a thick syrup and ingredients are thoroughly combined. Taste the dressing and add more honey, vinegar, or salt as needed. Store on the counter for up to a week or in the refrigerator for a month or so.

I like this dressing on just about everything: meat, salad, rice - get creative!

Wednesday, August 3, 2016

TUNA BURGERS gluten, egg, and diary free

So, canned tuna. Honestly I'm not really a fan. I grew up in the day of forced tuna sandwiches, soggy from sitting in school lunch packs. Really, just ick.

But a little awhile ago I was meandering the aisles at Costco and came across canned tuna I could actually get on board with. BPA-free cans, proudly wild and sustainably caught. Tuna has raised some serious concerns about the health of our oceans. Fish are being recklessly over-caught, usually by mass fishing tactics that reek havoc on the ocean floor and life found within the waters. As the larger countries demand more fish, indigenous cultures dependent on this food source for survival are forced into more dangerous waters and the use of life-threatening techniques. Scarcity has become a familiar opponent.

Eating local meats and supporting companies working to heal the gaping wounds of our waters are the best ways to do our part. And eating foods like canned tuna in moderation rather than as a staple food if you find yourself landlocked rather than ocean-side can help replenish the rapidly dropping fish numbers.

If you do find yourself with a can of our sea friends and have yet to decide what to do with it, I'd like to offer this recipe. You may never eat tuna salad again.

[THE RECIPE]
Serves 4
Adapted from Paula Dean's Tuna Burger

2 [6-ounce] cans of wild, sustainably pole & line caught tuna, drained [can find this at Costco]
1/2 c. oats, ground [grind rolled oats using food processor, appropriate blender, or coffee grinder]
2 flax "eggs"*
1/2 c. celery, finely chopped
1/2 c. onion, finely chopped
1 T. lemon juice
1 1/2 tsp. prepared horseradish [look for the jars in the refrigerator section if possible]
1 large garlic clove, minced
1/4 tsp. freshly ground black pepper
1 T. unrefined coconut oil

*To make one flax "egg", combine one tablespoon of ground flaxseed with 3 tablespoons of water. Mix and let sit for ten minutes or until the mixture thickens a bit.

For the dressing:

1/2 c. extra virgin olive oil
1/4 c. raw apple cider vinegar
1/4 c. raw honey
2 - 3 T. Dijon mustard
1 T. dried dill
pinch sea salt

Combine all burger ingredients, except oil, in a medium-size glass bowl using your clean hands. Take a portion of mixture, roughly 1/3 cup, and form into a well-packed ball. Carefully flatten into a burger shape, cinching and patting the edges where necessary and set on a plate. Repeat until all burger batter is formed into patties.

Preheat oven to 350 degrees. In a large cast iron or stainless steel skillet, heat oil over medium heat until hot but not smoking. Carefully place burgers in pan and cover. Cook for 6 - 7 minutes or until bottom is a deep golden brown color. Flip, re-cover, and cook for an additional 5 minutes.

If you're using a cast iron skillet, place entire skillet into preheated oven. If using stainless steel, remove burgers from pan, spread out on baking sheet, and place in oven. Bake for 15 minutes.

Meanwhile, combine dressing ingredients into a small jar and tightly secure lid. Shake vigorously for a couple minutes until well combined. Set aside.

Remove from oven and serve immediately. Burgers can be used like traditional beef burgers or laid on a bed of herbs [like parsley, cilantro, and/or dill] or fresh greens and topped with dressing.

These are great to freeze and dressing can be stored in refrigerator for up to a month.


Tuesday, November 17, 2015

PEACE-KEEPING AND PAN-FRIED PAPRIKA SALMON with quinoa and herbs


Beirut. Burundi. Paris. And untold, unacknowledged places across the globe.

Recent events have reminded me we live in a world full of humans and we humans have a powerful opportunity with every breath we take to poke holes in our world. These pinpricks can either offer us a glance into a parallel universe filled with beauty and hope and love and compassion and eternal grace or a devastating view into death and destruction and pain and heartache and loneliness and loss.

It's crushing when the latter is chosen.

I'm convinced the only way to respond to violence is to grieve deeply and then do the work of cultivating peace in our own souls. To find beauty and worth and truth in whatever takes our days from normal to holy. To invest ourselves in that which leads us to encounter the divine. To find whatever allows us to smile more honestly, to look deeply into the eyes of a stranger and find our own stories there, to pause within the course of a day and say "thank you" - to tap into whatever this is daily and give ourselves fully to this work of peace-making.

I paint for peace.

I practice yoga for peace.

I giggle and laugh and walk in the grass and breathe with intention for peace.

These are my tangible, flesh and earth and life prayers for peace.

These are the things that allow me to look into the eyes of the person behind the counter and smile with authenticity. These are the things that give me the grace to wave at daily unkindness and see a lonely, exhausted, and hurt person instead of cruelty. To acknowledge that I've been there too, I've felt that way too, I've acted out of those places too.

I don't know how I would handle what has happened across the ocean. I hope I never have to find out. My heart breaks for those who have lost so much. Here's what I do know: I can't solve all things, especially these big, global things. But I can do the work within that brings freedom and forgiveness and peace. And maybe, just maybe, that's enough.

May you find whatever fills you with joy and creativity and life, and with each moment know that when you take the time to entertain this thing you do, you are cultivating peace in this world. 


This dish is a mainstay in our house. Full of healthy fats, protein, vitamins, minerals, and beneficial bacteria, my kids and I try to get this in at least once a week. We mix up the grain and flavors, Indian-spiced rice [in lieu of quinoa], Chinese 5-spice [instead of paprika], and parsley or cilantro [rather than dill] being another favorite.  

[THE RECIPE]
Serves 2

2 wild caught Alaskan salmon fillets
1 - 2 T. ghee or pure, extra-virgin coconut oil
sea salt
sweet paprika
smoked paprika
1 c. uncooked quinoa, rinsed
2 c. water
1 c. fresh herbs like dill, parsley, cilantro
1/4 c. raw sauerkraut
1 avocado

Place uncooked quinoa in a fine mesh strainer and rinse under cold water until water runs clear. Put rinsed quinoa into a medium size sauce pan and add water and a pinch of sea salt. Cover and bring to boil over high heat. As soon as the water boils, reduce heat to low and cook covered until all of the water has been absorbed [approximately 7 - 10 minutes]. Once the water has been absorbed, remove from heat and let sit for 5 minutes.

While quinoa is cooking, drain salmon fillets and pat dry. Sprinkle each filet with a generous amount of sea salt, sweet paprika, and smoked paprika. Set aside.

Heat ghee or coconut oil in a small cast iron skillet or stainless steel pan that has a cover. Once melted, the ghee or oil should thoroughly cover the bottom of the pan. Once the ghee or oil is just beginning to sizzle, carefully place fillets skin side up in the pan. Cover immediately and let cook on medium-high heat for 3 - 5 minutes. Remove from heat and let sit, covered, for an additional minute or so. Gently remove skin if desired and discard [great for compost!].

Arrange cubed avocado, fresh herbs, sauerkraut and cooked quinoa on a plate. Place salmon on quinoa, drizzle with a little olive oil if desired, and sprinkle with sea salt.


Thursday, July 23, 2015

TURKEY SALAD [EGG, NUT, GLUTEN, AND DAIRY FREE]

One of my favorite restaurants has an amazing chicken salad I crave from time to time. This is my
homemade dairy, soy, and egg-free attempt to satisfy a craving and use up a turkey I had tucked away in the freezer around Thanksgiving.

[THE RECIPE]

1 c. water
1/2 c. hemp seeds
1/4 c. olive or caper juice [optional]
3 T. dijon mustard
2 T. raw honey
1 lemon, juiced [about 2 T. lemon juice]
1 - 2 garlic cloves, peeled
1 tsp. sea salt
1 tsp. sweet paprika
1/2 tsp. onion powder
1/4 tsp. turmeric powder
1/4 tsp. smoked paprika
freshly ground pepper, to taste
2 c. extra virgin olive oil
1/2 - 1 c. loosely packed fresh dill leaves, stems removed, to taste
1/4 c. loosely packed fresh chives, finely chopped
breasts of one turkey or two chickens [organic, pasture raised, local if possible], roasted* or cooked and shredded

In a high-speed blender, combine water, hemp seeds, olive or caper juice, dijon mustard, honey, lemon, garlic, salt, paprika, onion powder, turmeric powder, smoked paprika, pepper, and oil. Blend on high until very smooth and creamy. Taste and add salt or pepper as needed. Set aside.

1/2 - 1 c. thinly sliced radishes
1/2 - 1 c. thinly sliced celery

Fill a medium bowl 3/4 of the way full with water and ice. Set aside. Bring water to boil in a medium stainless steel pot. Add radishes and celery and blanch for 1 minute in boiling water. Remove vegetables and place in ice water. Let cool for a couple minutes and then strain.

In a large glass bowl, combine cooked and shredded turkey or chicken and blanched vegetables. Slowly add prepared dressing a 1/2 cup or so at a time until the meat and vegetables are thoroughly covered. Serve warm as sandwich, on a bed of greens, or on a bed of kale rubbed with a little olive oil to soften or refrigerate until ready to serve. Garnish with raw sauerkraut, olives or capers, toasted nuts or seeds, avocado, pickles, etc.

*[ROASTED TURKEY]

1 lemon, washed and cut into wedges
1 large handful each of fresh dill and chives
1 - 2 T. extra virgin olive oil
2 tsp. sweet paprika
1 tsp. smoked paprika
1 - 2 tsp. sea salt
1/2 - 1 tsp. freshly ground peppercorns

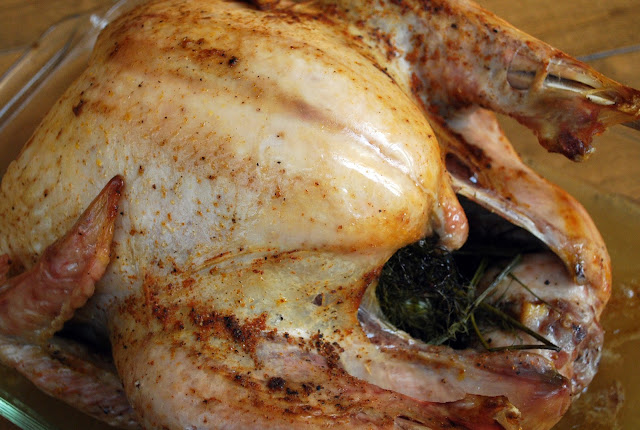
Thaw turkey in refrigerator. This may take a few days so plan ahead. Prior to baking, remove bag of giblets from inside of turkey. Place the bird in a large glass baking dish and rub whole turkey with a little olive oil, paprika [sweet and smoked], sea salt, and freshly ground pepper. Stuff inside cavity of the bird with the lemon wedges and fresh herbs

Fill baking dish with 2 - 4 cups of water or enough to have about 1/2 inch of water in the bottom of the dish..

Cover entire dish with tinfoil and roast at 325 degrees F for 2 - 3 hours or until the inner temperature [thermometer in thigh] reaches 165 - 170 degrees. Uncover for last 15 minutes.

Remove from oven and let stand at room temperature for 20 minutes to cool enough to slice.


Wednesday, April 8, 2015

[MEAT]ING OUR BODIES WHERE THEY'RE AT + SPRING QUINOA SALAD WITH LAMB MEATBALLS

About this time two years ago, my body started poking at me, giving gentle nudges and indications that something wasn't quite right. I was aware of the issues but at the time in survival mode - processing through the aftermath of a house fire, a baby who wouldn't sleep more than 3 hours each night, and a number of other things my family found ourselves in the middle of. Looking back on it now I easily see the progression, but in the moment my life was lived minute by minute. Over that year things very quickly spiraled downward and my body simply stopped accepting the foods I was eating regularly. I knew there was a problem, yet the healing tools in my arsenal and the very minimal energy I had in the storehouse just wasn't enough. At some point I realized this was more than I could manage on my own. Both conventional and functional medical systems were stumped. Tests were run, procedures done, nothing found. Frustration and desperation overload.

Eventually I was existing on quinoa and a small handful of vegetables my body could digest. I needed more. Clearly.

I had eaten meat-free for a number of years beginning in college. I felt good and didn't crave meat so I figured, hey!, this must be my groove. What I neglected to consider is that my body didn't have one mode - a setting I could figure out, click into, and cruise on throughout life. I understand now my body changes from day to day, week to week, month to month, year to year, season to season. I consistently hear [and say] as a parent everything is a phase - nothing lasts forever. It's true for parenthood, for our bodies, and for life.

While I was pregnant with my first child my body screamed for burgers and bacon and cheese. Rather than finding the best version of these I could, I quieted the voice with what I assumed to be "healthier" choices. When my second came around that same voice upped the volume yet my stubbornness and head knowledge took over, convincing me once again this inner voice was somehow incorrect. It couldn't really be asking me to eat meat, right?

Although both babies were healthy [so much gratitude for this!], I came away exhausted, depleted, and malnourished. My body stopped receiving the nutrients from the food I was feeding it and I was feeling every bit of the effect.

And so I started eating meat. There are oodles of books on animal cruelty and the detriment of eating meat with extremely convincing scientific studies. I don't doubt the validity in this way of thought and I do believe as a nation we eat far too much tragically raised animal products on a regular basis. What I do doubt is that a meat-free way of eating is feasible for all. The Ayurvedic tradition uses meat as medicine and I love this. I love that meat holds a respected place in this system which also values animal rights, care, and protection. 

So I ate - minimally at first but then with a vengeance. Let me make this very clear, meat wasn't the only thing that healed my body. Healing took a lot of work on many levels and continues to do so. I have been so blessed by the skillfulness, kindness and knowledge of a naturopath, body/energy worker, and acupuncturist and most of my healing is a direct result of the work I've done with each. But meat did act as a catalyst. Eating meat taught me grace, humility, and a different form of ahimsa [non-harming] than I had been practicing. 

And it gave me hope. Something I desperately needed at that time.

These days, meat is still a part of my diet but it plays a far less prominent role. I rely more on gelatin and bone broth and have been able to slowly bring back some of my favorite meat-free staples. My forage into consuming animals has shown me balance and perspective are two things worth making friends with and practicing as much as possible. It's not easy, especially that perspective thing, but it provides the ability to understand situations in a way tunnel-vision simply doesn't allow.

Most importantly I've learned it takes a community. It takes a group of people to help each of us live well, heal well, and offer us the love and grace to learn the tough, uncomfortable lessons of life.

My hope is that this part of my story encourages you in yours and extends permission to explore releasing the areas of life you grasp so tightly. Many blessings.


[THE RECIPE]
Recipe adapted from this Killer Quinoa Salad Recipe

2 c. quinoa
4 c. cold water
1/2 tsp. sea salt
zest and juice of one lemon
2 T. raw apple cider vinegar
1/2 tsp. ground cumin
1/2 tsp. ground coriander
sea salt + freshly ground pepper
4 T. extra virgin olive oil
3 medium yellow onions, cut into very thin slices
5 - 6 small garlic gloves or 3 large cloves, cut into very thin slices
1 bunch of kale cut into very thin ribbon-like strips
2 c. or one 15-ounce can of cooked garbanzo beans
2 fresh green onions, cut into thin slices
1/3 c. dried cranberries
1/3 c. sliced almonds, lightly browned or toasted

Begin by warming 2 tablespoons of olive oil and onions in a medium size skillet over medium-low heat. Once the onions begin to sizzle, reduce the heat to low. Carmelizing the onions will take about 45 minutes so it's important to begin with this. Occasionally stir the onions to prevent them from getting too brown. At about the 30 minute mark, add the slivered garlic to the onions. Continue to stir occasionally until the onions are a deep golden color and very soft. Remove from heat and set aside to cool.

While the onions cooks, place the quinoa in a fine mesh strainer and rinse under cold water until the water runs clear. Put the rinsed quinoa into a medium size pot and add water and 1/2 tsp. sea salt. Bring the water to boil, reduce the heat low, and cover. Cook until all of the liquid has been absorbed [about 15 minutes]. Once the water has been absorbed, turn off the heat and remove the lid. gently fluff the quinoa in the pot with a fork every 10 minutes or so until the quinoa has cooled to room temperature. If you're short on time simply spread the cooked quinoa out onto a couple rimmed baking pans to cool.

While the onions and quinoa are cooking, mix the lemon juice, lemon zest, apple cider vinegar, cumin, coriander, and a pinch or two of salt and pepper in a small glass jar with a tight fitting lid . Secure the lid tightly and shake for 30 seconds. Place dressing in refrigerator.

Place 2 T. olive oil and the cut kale into a large skillet over medium-low heat. Stir frequently until the kale becomes soft and turns a bright green color. Add the garbanzo beans, saute for 1 minute or just enough to warm, remove from heat and set aside to cool.

Once the onions, kale and quinoa have cooled to room temperature, place the quinoa, onions, kale and garbanzo beans in a large glass bowl. Add green onions, cranberries, and slivered almonds [if using] and gently stir to combine. Drizzle the entire salad with dressing and carefully stir well to combine.

Serve immediately or refrigerate. Salad will keep for 1 week or you can freeze to enjoy later.


[LAMB MEATBALLS]
Makes approximately 15 meatballs

A special note: In eating meat, I think it's extremely important to mention my family and I try hard to support our local farmers who raise animals in a respectful, loving way. We bless the animals blessing us and we've chosen not to consume the meat of any animal who has suffered through a heartbreaking life. We believe eating meat is both a privilege and a responsibility - something to be taken seriously and done with great care. This can be done by choosing local, organic, pasture-raised meats, eggs, and dairy without added chemicals, hormones, or antibiotics. Better yet, make a visit to the farm you purchase your meat from. See how they raise the animals and get a sense of the heart of the farmer. You may just land yourself a friend in the process. 

1 lb. organic, pasture-raised ground lamb
1 T. extra virgin olive oil
1/4 c. fresh cilantro, finely chopped [if using dry cumin and coriander] OR fresh parsley, finely             chopped [if using dry parsley and oregano]
1 tsp. each cumin and coriander OR parsley and oregano
1/2 tsp. garlic powder
1/2 tsp. onion powder
1/2 tsp. sea salt
freshly ground pepper

Combine all of the ingredients in a medium-size glass bowl and mix well using a spoon or your hands. Form into small meatballs and place in a glass baking dish. Cover and refrigerate for 30 - 60 minutes.

Preheat oven to 375 degrees. Place meat balls on a parchment paper lined baking sheet and bake for 10 to 15 minutes or until the inside of the meatballs are no longer pink.

Remove from the oven and serve immediately.

[HERB YOGURT SAUCE]

1 c. plain Greek yogurt or unsweetened dairy-free yogurt of choice
1/2 lemon, juiced
1/2 c. fresh cilantro or dill, chopped finely
1/4 tsp. garlic powder
1/4 tsp. onion powder
sea salt and freshly ground pepper, to taste

Place all ingredients in a glass bowl and mix well. Taste and adjust as you need. Cover with a secure fitting lid and refrigerate for 30 - 60 minutes or make the night before.


Monday, January 26, 2015

THE 'ALL THINGS WINTER SQUASH' SQUASH POST


This past fall something came over me and, like a squirrel collecting acorns, I stashed winter squash everywhere. Garage, basement, upstairs bedroom, refrigerator - basically wherever I could find cool, semi-empty space. There are a few reasons I look forward to winter each year: the fires, the soups, the warm blankets and slippers, the slowing down-ness of life and movement, the holidays, and the squash.

Okay, its mostly the squash.

Over the years I've collected and created a number of disappearing squash recipes and it's been a while since I've assembled them all in one place. So, here it is. If you have squash on hand or have been eyeing it at the market or store grab it. This is your one-stop, you have it so flaunt it, here's what to do with squash post.

[BREAKFAST / BAKED]

[BABY'S] PUMPKIN PORRIDGE
BRAN MUFFINS [sub fruit puree for squash puree]
PUMPKIN APPLE BREAD
PUMPKIN RICE BRAN MUFFINS
PANCAKES OR "SNEAKY CAKES" [sub fruit puree for squash puree]
SPICED PUMPKIN WAFFLES WITH MAPLE-GINGER SYRUP

[APPETIZERS / SNACKS / SIDES]

BAKED BUTTERNUT SQUASH CHIPS
BUTTERNUT SQUASH HASHBROWNS
ROASTED PUMPKIN SEEDS
SPAGHETTI SQUASH BABY CAKES WITH CRISPY SAGE

[MAIN DISHES / SOUPS / SALAD]

BUTTERNUT SQUASH LASAGNA
BUTTERNUT SQUASH MAC N' CHEESE
BUTTERNUT SQUASH PASTA SAUCE
CHIPOTLE BLACK BEAN STUFFED DELICATA
PUMPKIN RISOTTO
QUESADILLAS WITH "CHEESY" BUTTERCUP SQUASH FILLING
ROASTED DELICATA SQUASH
ROASTED VEGGIE-STUFFED HUBBARD SQUASH [great holiday dish!]
SIMPLE BREAKFAST [sub delicata squash or peeled and cubed winter squash for sweet potato]
SIMPLE PIZZA CRUST
SPAGHETTI [SQUASH] AND [NO MEAT] BALLS
SPAGHETTI SQUASH PAD THAI

BUTTERNUT SQUASH SOUP
END-OF-WINTER SOUP
WHITE CHILI WITH WINTER SQUASH BASE

SPRING SALAD [sub delicata or peeled and cubed winter squash for the sweet potato]
WINTER PUMPKIN MILLET SALAD

[DRINKS / SMOOTHIES]

CREME DE PUMPKIN SHAKE
PUMPKIN-GOJI SMOOTHIE [enjoy this warm for a nice winter twist]
SPICED PUMPKIN LATTE

[DESSERTS / SWEET TREATS]

BUTTERCUP CUSTARD
CREAMY PUMPKIN ICE CREAM
PUMPKIN-APPLE CRISP
PUMPKIN PUDDING
UP-SIDE-DOWN PUMPKIN PIE


Monday, August 4, 2014

TWO SUMMER SALADS, ONE HERB DRESSING

Every March it happens. I become so giddy with the idea of fresh herbs I start, what seems like, way too many seeds. Then July rolls around and I am so grateful for the endless supply of basil and other decidedly "summer" flavors. I've been enjoying this dressing alongside almost every meal, preferably while sitting on the patio with a small glass of coconut water kefir.

The dressing is really easy to make and, if you don't have a garden, you can easily find herbs in bulk at your local Farmer's Market. Don't let a missing herb stop you - blend together whatever combination suites you and sub herbs you love for ones you may not favor. This recipe is a combination of my favorites but really, go nuts with whatever you've got.

Within this post you'll also find two of my go-to salads. I love the balance of raw greens with cooked vegetables and tend to make a large batch of the veggies so I have them at the ready when meal-time rolls around.


[HERB DRESSING RECIPE]

Note: This recipe makes a larger batch, about 4 or 5 half pint jars. I make large batches of this dressing and freeze it in small glass jars for a bit of summer flavor come winter chill. 

2 cups organic, extra virgin olive oil
2 tsp. sea salt
freshly ground pepper, to taste
4 c. Genovese basil leaves
2 c. roughly chopped chives
1 c. lemon or lime basil [optional, if you don't have this simply add another cup of the Genovese basil]
1 c. parsley leaves
6 sprigs tarragon leaves

Optional Additions: toasted sunflower or pumpkin seeds; toasted walnuts; nutritional yeast; garlic - raw, powdered, granulated, or roasted; onion powder; cayenne pepper

Pour oil into a large blender or food processor. Add salt and pepper. If you have a blender with a tamper you can layer all of the herbs [except the Genovese basil] into the blender and blend to smooth. Add the Genovese basil and blend again to smooth. If you are using a food processor or basic blender, add herbs in stages and blend to smooth before adding the next herb. Mixture should be thicker than standard dressing. If you prefer a pour-able dressing you can add a bit more oil and a couple pinches of salt.

Store in an airtight glass jar or freeze in small glass jars for winter use. I love this dressing with just about everything: salads, butternut squash hashbrowns, zucchini pasta, quinoa, fish, etc.

[CUMIN CARROT-RADISH + HERB QUINOA SALAD RECIPE]

4 - 5 medium size carrots, rinsed and sliced
8 - 12 radishes, rinsed and sliced
1 - 2 T. coconut oil or ghee, melted
4 T. whole cumin seeds
1 tsp. sweet paprika
sea salt and freshly ground pepper, to taste
1/2 c. cooked soaked and sprouted quinoa* [this is a great way to use leftover quinoa from a previous meal]
1 T. herb dressing [see recipe above]
large handful baby greens or salad blend, rinsed and spun dry
1/2 avocado, sliced
1 - 2 T. raw, unpasteurized sauerkraut [optional]**
1 T. extra virgin olive oil [optional, I love using a lemon-flavored oil with this salad]

Place cumin seeds, paprika, a pinch or two of sea salt and ground pepper in a spice grinder or dry vita-mix container. Grind until seeds are powdered. Set aside.

Preheat oven to 375 degrees. On a baking sheet, toss carrot and radish slices with oil or ghee. Sprinkle ground cumin mixture over the oil-coated vegetables and mix well [using your hands works best here]. Bake for 20 - 30 minutes or until vegetables are soft when poked with a fork.

While vegetables are baking, heat quinoa in a cast iron skillet over medium heat for about 5 - 7 minutes, stirring frequently. Reduce heat to low and add herb dressing. Toss until quinoa is well coated.

Arrange greens on plate of choice. Drizzle with olive oil and layer warmed herb-quinoa, roasted vegetables, avocado, and sauerkraut. Enjoy immediately or cool.

*Soaking and sprouting quinoa really improved digestibility. Place quinoa in a glass jar and cover with double the amount of water. You can add a tablespoon or two of apple cider vinegar to increase the benefits of soaking. Cover with cheese cloth or mesh sprouting lid and let stand for 12 hours. Drain water, rinse, drain, and rinse. Place in jar in a warm, light area and rinse once or twice throughout day. Sprouts should appear in 24 - 36 hours. After sprouts appear, rinse and drain once more. Place in a pot and fill with just enough water to cover quinoa. Cover, bring to boil, and reduce heat to low until all liquid has been absorbed. Let stand covered for 10 minutes and then fluff with a fork. 

**Raw, unpasteurized sauerkraut is packed with friendly bacteria. It's a great addition to any meal. If you purchase, make sure it is from a reputable source.

[GREEN BEAN + QUINOA SALAD RECIPE]

2 c. fresh green beans, cut into 1-inch size pieces
1 small onion, finely chopped
2 cloves garlic, minced
sea salt and freshly ground pepper, to taste
1/2 c. cooked soaked and sprouted quinoa* [this is a great way to use leftover quinoa from a previous meal]
1 T. herb dressing [see recipe above]
large handful baby greens or salad blend, rinsed and spun dry
1/2 avocado, sliced
1 small cut of wild-caught, sustainably harvested fish of choice [I enjoy salmon or halibut]
1 T. + 2 tsp. coconut oil or ghee

Warm one tablespoon of oil or ghee in a medium-sized cast iron skillet or medium. Add onion and saute until very soft and just beginning to brown. Add garlic and saute for a minute or so. Toss in cut green beans and saute until beans are bright green [or yellow or purple depending on variety] and just beginning to soften. Remove from heat and set aside. 

In another small skillet, heat cooked quinoa over medium heat for about 5 - 7 minutes, stirring frequently. Reduce heat to low and add herb dressing. Toss until quinoa is well coated. Add quinoa to cooked green beans and set aside. 

In the same skillet used for quinoa, warm 2 tsp. coconut oil or ghee over medium-high heat. Rub fish filet with sea salt and freshly ground pepper [you can be generous here!]. Carefully place filet in pan with oil and cover. When first side is browned flip and return cover. Cook until desired level of done-ness has been reached. You could also bake or broil fish if preferred.

If beans and quinoa have cooled, warm over low heat. 

Arrange greens on plate of choice. Layer with warm herb-quinoa and sauteed beans, avocado, and fish. Enjoy immediately or cool.

*Soaking and sprouting quinoa really improved digestibility. Place quinoa in a glass jar and cover with double the amount of water. You can add a tablespoon or two of apple cider vinegar to increase the benefits of soaking. Cover with cheese cloth or mesh sprouting lid and let stand for 12 hours. Drain water, rinse, drain, and rinse. Place in jar in a warm, light area and rinse once or twice throughout day. Sprouts should appear in 24 - 36 hours. After sprouts appear, rinse and drain once more. Place in a pot and fill with just enough water to cover quinoa. Cover, bring to boil, and reduce heat to low until all liquid has been absorbed. Let stand covered for 10 minutes and then fluff with a fork. 

Sunday, January 12, 2014

THE ART OF SIMPLE + [LOCAL] WINTER DETOX SALAD


I often live under the illusion all my meals need to be spectacular. You know, full of complexity and perceived "wow!" factor, a table full of mouth-watering dishes, everything coming together seamlessly. When I look at how my life, specifically meal time, actually is I find mealtimes miles from whatever immaculate images I've created in my mind - it's  laughable.

Here's maybe the most important lesson I've learned about feeding people well:

Keep it simple.

It sounds obvious but in reality I need to remind myself of this truth daily. What I know is if I don't keep food simple it just doesn't work. I slack, I rely on the leftovers of leftovers, I get to 5:00 and start to panic, or deem the evening "on your own night". I'm frazzled and frantic and grumpy because I've let myself down again. I'm not present and therefore can't enjoy anything - my husband, my kids, the people around our table, the setting, the smells, the tastes. I miss all of it because I'm in recovery mode.

And then I look into the eyes of my girls and get a sucker punch to the gut. What I'm teaching them is perfection is most important and if perfection can't be attained then just scrap it all, be cranky, and eat popcorn.

[Big gulp.]

Here's the thing, when I keep my meals simple, fresh, local, and "me" I actually serve more than just food to those I love. I give them a piece of my heart, my time, my effort, and all the good things I want for them. I'm giving my girls a sustainable and joyful way of doing food, something they can carry with them their entire lives.

When I hone in on what I'm good at making and enjoy eating, the meal comes out the way I want every time. I can relax and take pleasure in the process, experimenting along the way. This is what makes cooking fun and what brings me back to the kitchen each day. I like the comfort in familiarity that allows for creativity and adventure.

So, if you've struggled to "get it right" in the kitchen, find a few [seasonal, healthy] meals you like to make and cook them a lot. Get comfortable with the process and then experiment with different flavors and ingredients that reflect your own uniqueness. For me these are sauteed veggie scrambles, soups, and salads. I can make a mean veggie-hash in minutes or throw together a salad bar from almost anything. Over time I've learned what flavors I love and which I hate, creating my go-to dressings and seasonings that make assembly a cinch.

Don't feel like you have to scrap all your grandiose meal plans, just save them for the weekend or an open day. If you head into complex meals with the space they demand, I promise you'll have a lot more fun.

Here is one of my favorite, simple, and local lunches that provides the "fresh" reminiscent of summer yet uses seasonal produces and flavors. This is an especially great meal to enjoy while detoxing!


[WHERE DO I FIND LOCAL PRODUCE IN WINTER?]

If you live well north of the equator, it's no secret winter is upon us. Glance out your window and the banks of snow, maybe snow flake flying, and biting temperatures will remind you of this. But all is not lost when attempting to support your local community with your food purchases. In many parts of the country winter farmer's markets are popping up surprising us all with the bounty farmers have year-round. If you can't find a winter market check in at your local health food store - many are locally minded and stock produce direct from your area whenever possible.

Although olive oil and some herbs and spices aren't grown and produced in my area, purchasing them from a local artisan or market gives money to small business rather than big box stores. I like to use well-crafted, high-quality olive oil on my salads for their intensity and variety of flavor.

That being said, if you live in West Michigan, my favorite haunts are:

Sweetwater Local Foods Market
Harvest Health Foods
Nourish Organic Market & Deli
Global Infusion [for herbs / spices / teas]
Old World Olive Oils

Even changing just one or two of your common purchases from large stores to local businesses can make a big difference. If each of us did this, imagine the impact we'd make!


[THE RECIPE]

1 small head of savoy cabbage, thinly sliced [If your cabbage is a bit wilted, cut and place into a bowl of water with a large handful of ice. Allow cabbage to soak for 20 - 30 minutes or until it's crispy again.]

1/2 delicata squash [I roast the whole squash and save extra for another time], reserve seeds
sage or rosemary, ground
caraway seeds, whole [optional]
sea salt

squash seeds of delicata squash
sea salt
nutritional yeast

1/2 kohlrabi, peeled and either shaved [use vegetable peeler or mandolin] or cut into match sticks
2 radishes, thinly sliced
3 - 4 baby turnips, thinly sliced
1/2 [local] apple, cubed
homemade sprouts [mix of choice, alfalfa is great for detoxing]*

juice of 1/2 lemon, freshly squeezed or 1/2 - 1 tsp. local apple cider vinegar
extra virgin, first cold-pressed olive oil [from local specialty store]
splash of local, organic, pure apple juice [if added sweetness is desired]

Preheat oven to 425 degrees. Wash and dry delicata squash. Cut in half, length-wise, and scoop of pulp and seeds. Separate seeds from pulp, rinse in fine mesh strainer, drain, and set aside. Slice the squash into 1/2-inch piece, cutting along the width. Then cut those slices into either thirds or quarters. Toss with a tablespoon or two of olive oil and sprinkle with a few pinches of sage or rosemary, caraway seeds, and sea salt. Rub seasoning in to pieces using your hands. Place on parchment paper lined baking sheet or directly on stone baking pan. Roast for 25 - 30 minutes, tossing at the 20 minute mark.

While squash is baking, place rinsed and drained squash seeds on another parchment lined baking sheet or stoneware pan. Toss with a pinch or two each of sea salt and nutritional yeast. Set aside [if you have an additional oven or toaster oven you can bake these while squash is roasting]. When squash is done, set oven to 375 and bake squash seeds for 10 - 20 minutes or until golden brown and crunchy.

While squash and seeds are roasting, prepare additional ingredients as noted above.

Toss prepared cabbage and kohl rabi. Drizzle over salad a tablespoon or two of olive oil and freshly squeezed lemon juice. When squash is done, toss with cabbage mix.

Top with a layer each of sprouts, turnips, radishes, and apples. Sprinkle with roasted squash seeds and eat to reducing toxins, good health, and supporting our local communities!

*To make homemade sprouts: purchase seeds specifically used for sprouting [will note on the package]. In a large glass jar, place seeds to cover bottom and cover with four times the water. Place a piece of screen or cheesecloth over the jar and secure with a rubber band. You can also purchase a sprouting jar. Let the seeds soak for 24 hours. Double check to make sure the cloth or screen is securely in place and then drain the water from the seeds. With cloth or screen still on bottle, let water run through to fill the jar. Drain water again, tip jar to side and place in a sunny windowsill. Gently rinse and drain the seeds 2 - 3 times a day for 3 - 5 days or until sprouts are a few inches long. Remove sprouts from jar and store in an airtight glass container for no more than a week. 


Friday, November 15, 2013

THREE WINTER SALADS + ONE DRESSING

Okay, salads are easy. I mean really easy. This makes salads perfect for the 5 o'clock "what's for dinner?!" panic and something I rely on for many of our summertime meals.

However, winter makes finding fresh local greens and the standard cucumber + tomato combination next to impossible or really, really expensive [both in transport and in purchase].

Yet I love and crave salads and have come to anticipate each season's special twist. So here are three of my favorite winter-friendly salads I make more than I care to admit.

I encourage you to drop into a winter Farmer's Market or find a local farm with a winter CSA option available, stock up on these veggies, and enjoy warm salads all winter long. I like to make these in the full batches and save for easy lunch options. All three also make fantastic sides for holiday celebrations.

[DRESSING]
This is the dressing you will use on all of the salads below.

1 part of equal parts raw cider vinegar + lemon juice [1/2 cup is a good place to start]
1 part extra virgin olive oil [1/2 cup is a good place to start]
1 - 2 T. raw local honey or maple syrup [adjust to taste]
2 - 3 tsp. gluten-free Dijon mustard [adjust to taste]
large pinch or two of sea salt

Place all ingredients in a glass jar and seal with tight fitting lid. Shake vigorously for a minute or so until all of the ingredients have been incorporated.


[WARM BEET SALAD]
Serves 2

1 large beet - washed, peeled [optional if using organic beets], cubed
1 large carrot - washed, peeled [optional if using organic beets], sliced
1 - 2 T. extra virgin olive oil
small handful [about 2 T.] cashews - slightly crushed and toasted*
2 - 3 T. dressing [recipe shown above], adjust to taste

Preheat oven to 425 degrees. Place the chopped beets and sliced carrots on a stone or parchment lined baking sheet. Drizzle with olive oil and toss until all pieces are covered in oil. Place in preheated oven and roast for 10 - 15 minutes or until vegetables are just soft.

Remove from oven, spread onto plate or bowl and toss with a couple tablespoons of dressing. Sprinkle with toasted cashews and serve warm.


[WARM BROCCOLI + KALE + WHITE BEAN SALAD]
Adapted from Whole Living Magazine: Issue No. 73 / January-February 2013, p. 51
Serves 4 - 6 

3 c. broccoli, stalk + leaves + florets, rinsed and cut into chunks
1 large bunch of Lacinato or favorite kale variety, washed and chopped
3 c. white beans, soaked and cooked
1/2 c. chopped parsley [if available]
1/3 c. toasted sunflower seeds*
2 T. extra virgin olive oil, divided
1/4 - 1/3 c. dressing [recipe shown above], adjust to taste

Steam cut broccoli stalk[s], leaves, and florets until bright green and just soft but still a bit crunchy [about 3 - 5 minutes]. In a large cast iron skillet, saute kale in 1 T. of the olive oil over medium-high heat until the kale is bright green and just soft. Place broccoli in a large food processor and pulse to chop into small pieces. Place into a large glass bowl and repeat with the kale and parsley. Place with chopped broccoli, cover, and set aside. In same large cast iron skillet pour in remaining 1 T. olive oil and bring to just hot. Carefully add beans, toss and let sit a minute or so. Stir and repeat. Beans should begin to brown on edges. Remove from heat and add to bowl with broccoli, kale, and parsley. Add toasted sunflower seeds and dressing and gently toss it all together adding more dressing if necessary. Serve warm.


[WARM KASHA SALAD]
Adapted from Delicious Living Magazine: November 2013 Issue, p. 34
Serves 4 - 6

6 cups of loosely packed arugula, rinsed and spun or patted dry
1 medium to large onion, chopped
1 1/2 c. sliced celery [may be available at Farmer's Market into November] - rinsed and sliced
1 large or 2 small kohlrabi - rinsed, peeled, and chopped
2 large radishes - rinsed and chopped
1 - 2 medium-large carrots - rinsed, quartered, and sliced
1 - 2 T. extra virgin olive oil
1 c. hulled, gluten-free buckwheat groats or kasha [soaked for 4 - 6 hours, drained, and rinsed]
4 c. pure water
1 tsp. sea salt
1/2 c. pumpkin seeds, toasted*
1/2 - 3/4 c. dressing [recipe shown above], adjust to taste
Roasted white or garbanzo beans ["Mildly Spicy" recipe], optional

In a medium sized stainless steel saucepan bring 4 c. water to boil. Add salt and soaked buckwheat groats. Cook for 7 - 10 minutes or until just soft. Drain in a fine mesh strainer, rinse briefly with cold water, place in glass serving bowl, cover and set aside. In a large cast iron skillet place oil and onion. Bring to sizzle and then reduce heat to medium low, stirring occasionally, until the onion is soft and just transparent. Add celery and carrots and cook for a few more minutes. Add kohlrabi and radishes and cook another few minutes or until vegetables are just soft and warm but remain crunchy. Remove from heat and add to cooked buckwheat. Sprinkle in toasted pumpkin seeds, dressing, and stir until well mixed. Place about 1 cup of arugula on 6 plates [or simply in a large serving bowl] and top with a large scoop of the warm kasha salad. Garnish with roasted white or garbanzo beans [optional] and serve warm.


*To toast nuts or seeds: If you have a toaster oven, spread nuts or seeds out on a baking sheet. Using the "Toast: 1" or lowest setting, cook until beeper goes off. If you are using a skillet: place nuts or seeds in skillet and bring heat to high. Toss continuously until nuts / seeds become slightly browned, adjusting heat as necessary. If you are using an oven: place nuts / seeds on baking sheet and place in 300 degree preheated oven. Watch carefully and remove when they are slightly browned or smell really nutty.

Friday, May 24, 2013

DANDELION & 4-GREEN PASTA

This year we are resting our garden, a year of jubilee of sorts. The area we use to grow our goods has been worked, and pushed, and tilled, and faithful to us for around seven summers and we thought, as a way of saying thanks, we would allow it to rest. To just be. To gather steam and health and goodness for the next line of growing seasons.

This summer of celebration will hopefully allow us the time and space to do a couple things: re-design the garden, create more permanent raised beds, and feed the soil in a variety of ways [like compost and lasagna gardening - sounds delicious right?!].   

Taking a break from the seed starting, the watering, the weeding [although there is still a bit of weeding], the growing , the worrying, and all the other things that come with growing a garden has allowed me to notice the other edibles that surround where we live. What many view as weeds [myself included] are actually nutrient-dense, delicious foods that generally provide our bodies with exactly what we need when we need it. 

This inspired me to start a series of posts dedicated to these awesome edibles. To give you a little peak at what our yards and forests hold, how they can be used as both food and medicine, and hopefully inspire you to take a little walk around your yard with shovel and sheers in hand instead of the weed killer.

For each post, I'll give you the most common and recognizable name of each plant; parts of the plant used; whether the plant should be used externally, internally, or both; it's energies; medicinal uses and any precautions; and a recipe or two.

There are plenty of great herbal books out there should you choose to dive deeper [you can find a list of my favorites at the bottom of this post], so I will keep it short and simple here. 

May you walk outside with new eyes and a sense of adventure. May you find a bit of jubilee this season.

Special Note: Remember, whenever you are introducing your body to something new, educate yourself on what you are eating / using [especially if you have health issues / concerns]. Many of the herbs found here will be safe for most but each of us has a different composition and will respond to foods and herbs in our own unique way. 

[DANDELION: flower, leaves, roots]

Energy: [leaves] cool & bitter, [roots] cool, bitter, & sweet
Use: internal & external
For Infants & Children: Yes 
Precautions: some people may have an allergic reaction to the flowers and stems [generally those also allergic to chamomile and yarrow] - simply discontinue use if a rash occurs; should be avoided during antibiotic treatment; should be avoided if you have gallstones

Key Nutrients: vitamins A, B, C, and D; iron; potassium; calcium; magnesium; inulin; sesquiterpenes; carotenoids

Medicinal Uses: detoxification [one of the best liver decongestants and cleansers], blood purification and blood builder [one of the best available], aid for digestion, high vitamin and mineral content, enzyme balance, aids stomachaches, hepatitis, hypoglycemia, decreases blood pressure, anemia [again, one of the best], diuretic [especially for fluid retention], cystitis, nephritis, weight loss / appetite, energy and endurance, bladder infection, constipation, hemorrhoids, indigestion, IBS, gallstones, osteoporosis, good for reproductive organs, PMS, skin diseases / issues [acne, age spots, eczema, yellow jaundice], bodily restoration and rejuvination, cooling affect on the body

There is a reason this baby is tough to remove from your yard - all of those fighting, tenacious properties may be what make this plant such a nutritious food and powerful medicine.


Common Culinary Uses: salad greens, pasta, pesto, wilted and / or marinated greens, coffee substitute [roasted root], green drinks, wine, soups
[THE RECIPE: 4-GREEN PASTA]

1 package of gluten free pasta, spaghetti style
1/8 c. fresh mint, minced
1/4 c. fresh dandelion greens, washed / spun dry / cut into small strips
1/2 c. beet greens, cut into small strips
1/2 - 1 c. chard, cut into small strips
1/4 - 1/2 c. Everyday Vinaigrette [see recipe below]
1 - 2 T. dulse flakes
sea salt and pepper to taste

Cook pasta according to manufacturer instructions. While pasta is cooking, cut the greens and mix vinaigrette. When pasta is just soft [or al dente if you prefer], drain water and return pasta to pot. Quickly add vinaigrette and greens quickly tossing. Cover and let stand a few minutes to wilt the greens. Toss again. Add salt, pepper, and dulse flakes and stir well. Serve warm or cool.

This is really good served with Shaved Asparagus Salad [I half the dressing this recipe calls for because it is a bit too intense for my flavor. Start with a small amount of dressing and add until you've reached the flavor you desire. I also use Parma-Zaan in stead of Parmesan cheese].

[THE RECIPE: EVERYDAY VINAIGRETTE]
Recipe from Grow, Cook, Eat by Willi Galloway

In a pint size jar combine:

1/4 c. white wine vinegar
1/4 tsp. sea salt
1/2 tsp. honey or maple syrup
2 tsp. fine chopped shallot [optional]
2 tsp. Dijon mustard
1/3 c. chopped herbs
3/4 c. extra virgin olive oil

Cover tightly and shake vigorously for a minute or so. Store in refrigerator to keep longer and remove 5 - 10 minutes prior to use [oil will solidify over time].

You can also add fresh dandelion greens to this Caesar salad, green smoothie, spring detox tea, spring vegetable pasta saladsocca cakes - the options are endless!

[ADDITIONAL RESOURCES]

Hands On Healing Remedies by Stephanie Tourles
Medicinal Herbs by Rosemary Gladstar
Herbal Recipes for Vibrant Health by Rosemary Gladstar
The Way of Herbs by Michael Tierra
Prescription for Herbal Healing by Phyllis A. Balch
The How To Herb Book by Velma Keith & Monteen Gordon
Mother Earth Living Magazine's "All About Dandelions"


Thursday, May 24, 2012

SPRING VEGETABLE PASTA SALAD + HOMEMADE PRODUCE WASH

This past weekend our local Farmer's Market opened for the season. I have been going to an organic winter market, which has been really great, but of course there is nothing like our downtown marketplace on a warm, sunny Saturday morning. My husband, daughter, and I stroll around leisurely completely enthralled in our surroundings. Actually, I'm interested in the produce, my husband, the people, and my daughter, anything she can get her hands on. I tend to get lost in the variety and pure beauty of it all. I like to rustle my family out of bed and get there early, guaranteeing the best selection and the ability to chat with the farmers.

To my utter surprise, this past Saturday I struck gold in the form of greenhouse tomatoes and cucumbers. It has been quite a while since I have had either as the supermarket versions just aren't worth the price. I bought out one vendor's cucumber supply [which sounds a bit obnoxious but really it was only 6 cucumbers] and a few of his tomatoes, promising to return later in the week for more. On our drive home I eagerly dreamed up what dinner would come of these precious finds. My husband just smiled at my child-like enthusiasm. It's times like these that I cherish and am reminded that some things are simply worth waiting for if for no other reason than to experience the anticipation and pure delight of it all. I think a child remains in all of us, sometimes it just seems to get lost in our immediate gratification world.

When dinner time rolled around my daughter polished off half a cucumber while I laid on the counter all of the fresh ingredients I could find: ramps [or wild leeks], asparagus and spinach fresh from the garden, garlic and then more garlic [can you really have enough?], and of course my greenhouse treasures. It happened to be almost 90 degrees at the time and all I could think about was raw, raw, raw. So here is a recipe with minimal cooking [only a quick saute for the ramps, garlic, and asparagus and a dunking of the pasta] and a host of fresh ingredients compliments of my local farmer friends.

As a quick aside, remember even if you are purchase organic produce it is still important to thoroughly wash your produce prior to cutting and eating. Here is a simple homemade recipe that is worth keeping on hand.

[HOMEMADE PRODUCE WASH]


1 c. water
1 c. vinegar
2 tbsp. real lemon juice
2 tbsp. baking soda
10 drops grapefruit seed extract
3 tbsp. salt

Mix all ingredient in a clean spray bottle or regular bottle [for a soak solution] and shake well until salt has dissolved. Spray fruit / vegetables generously and allow to sit for 5 - 10 minutes or add 1/4 - 1/2 cup of solution to a sinkful of water [or bucket / bowl / etc.], adjusting the amount of solution to the container and amount of water you are using. Let soak for 15 - 20 minutes, rinse well and dry.


May you take the time to wander through a market somewhere and get in touch with where your food comes from. May you find ways to experience anticipation and delightful fulfillment and may the child inside you be freed.


[THE RECIPE]

1 12 oz. package of gluten free pasta [try Tinkyada's vegetable spirals]
Homemade Italian Dressing [I use 1 c. of homemade canned tomato sauce in lieu of a tomato]
1 tbsp. extra virgin olive oil
1 bunch of wild ramps, a leek, or 1 medium onion, chopped
4 garlic cloves, minced
1 lb. asparagus, cut into small chunks
2 tomatoes, chopped [I like blending red and yellow tomatoes. If you prefer low acid or have trouble with acid, use two yellow tomatoes]
1 - 2 medium size cucumbers, chopped
large handful of spinach leaves, sliced in thin strips
raw sunflower seeds [optional]

Cook pasta according to manufacturer's instructions. While the pasta is cooking [be sure to check it from time to time to make sure it doesn't get too soft], make the dressing and chop all of the vegetables. Set aside.

Drain pasta, return to pot [uncovered], and add half of the dressing. Toss until pasta is thoroughly coated.

In a large skillet heat olive oil until hot but not smoking. Add ramps and garlic and saute for 2 - 3 minutes. Add asparagus and saute another 2 - 3 minutes or until asparagus is softened a bit but still firm and crunchy.

In a large glass bowl combine remaining vegetables: tomatoes, cucumbers, and spinach. Cover with remaining dressing and toss until coated. Add the sauteed asparagus, leeks, and garlic. Gently toss. Add pasta and again gently combine until well mixed.

Scoop onto plates and garnish with a small handful of raw sunflower seeds if desired.

This dish can be served slightly warm [it will be a little warm when completely assembled] or chilled. Both are equally fabulous!


Note: You could also make this with brown or black [forbidden] rice, quinoa, or millet and it would be equally as good!


Saturday, August 20, 2011

SUMMER SALAD

Summer brings so many joys: long warm days, sunshine, swimming, open windows, color everywhere, kids playing outside, birds chirping, lazy afternoon naps [okay, maybe in a perfect world], summer camp [ie. vacation for parents] and best of all fresh foods! If you find yourself craving more salads, veggies, and sweet melons, dive head first into those cravings.

Summer is a great time to help the body slowly and naturally detoxify itself, get vitamins and minerals in their purest form, and allow the natural enzymes found in each food to do their jobs. Eating raw foods, direct from the garden [or somebody else's - check out your local farmers market] is a fantastic way to do that. The best part is--there is minimal to no preparation time [if you are like my husband, the cherry tomatoes don't make it into the house!]

Salads are another fantastic way to get creative even if you aren't so handy in the kitchen. This post is more a "motivational speaker" moment and really my simple attempt at encouraging you all to eat more raw foods this summer!

Try these homemade salad dressings to dress up your inspired veggie endeavors:


Monday, August 15, 2011

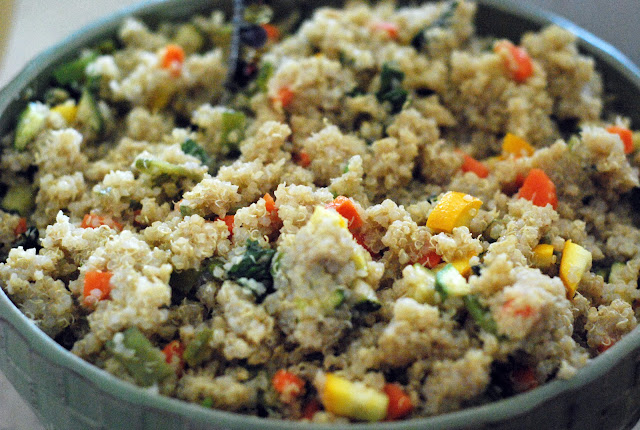
QUINOA SALAD


With the abundance of produce flowing from our garden [I think the New International should read "the land flowing with kale and summer squash"], I am always looking for creative and tasty ways to get more veggies into my diet and use the fruits of my labor. Conveniently, this time of year I tend to be drawn more towards cooler foods, like fresh vegetables, so this salad really fits the bill.

[QUI-WHAT???]

Quinoa [pronounced KEEN-whah] is one tough little seed that can easily be substituted for it's grainy cousins [think rice, wheat, etc.]. It grows best at high altitudes and under extreme ecological conditions giving this tiny guy a big advantage in the protein, endurance, and energy departments. Even though it's digestibility makes it an ideal food for the young, it sure aint no baby! Coming in ahead of the grain pack in it's protein content, it is equal [if not superior] to milk in quality and completeness [Got Quinoa? Catchy I think.]. It exceeds milk in the calcium content [seriously, it does] and is quite high in the scarce amino acid, lysine. Iron, phosphorous, the B vitamins, and vitamin E all find themselves wrapped up in this over-achieving, nutty little bundle.

So, here is the recipe that, most of the time, becomes a meal in itself. The best part is, I can pack it for an on-the-go lunch and know that I'm getting a meal packed with energy-boosting nutrients [no re-heating necessary].

1 c. uncooked quinoa
2 c. vegetable [or chicken] stock

1 c. chopped raw vegetables [I used zucchini, summer squash, carrots, and cucumber]
1/2 tsp. Real Salt sea salt
1/4 tsp. paprika
1/8 tsp. onion powder
1/8 tsp. fresh ground black pepper
1/8 tsp. garlic salt
1/8 - 1/4 c. olive oil [optional - this will make it softer but stickier]

Mix together all spices and set aside. In medium saucepan, combine quinoa and stock. Bring to boil over high heat, then reduce heat to low and let cook until liquid is gone and quinoa is light and fluffy [you could also sprout your quinoa and forgo the cooking option to make this a completely raw salad - remember to plan ahead on this]. Remove from heat and stir in spices [and oil if using, start with the smaller amount and add until desired texture is achieved], mixing well. Toss in vegetables and serve warm or refrigerate until cold.